Use AXI-Based BRAM IP to Remove DDR Requirement
This example shows how to deploy a deep learning network to an FPGA which does not have external DDR memory. You can remove the external memory requirement by adding an AXI-based block RAM (BRAM) IP core to your custom reference design and connecting it to the deep learning processor. In this example, you:
Create a custom BRAM reference design.
Generate a custom processor and bitstream.
Deploy the network by using the custom bitstream and retrieve the network prediction results.
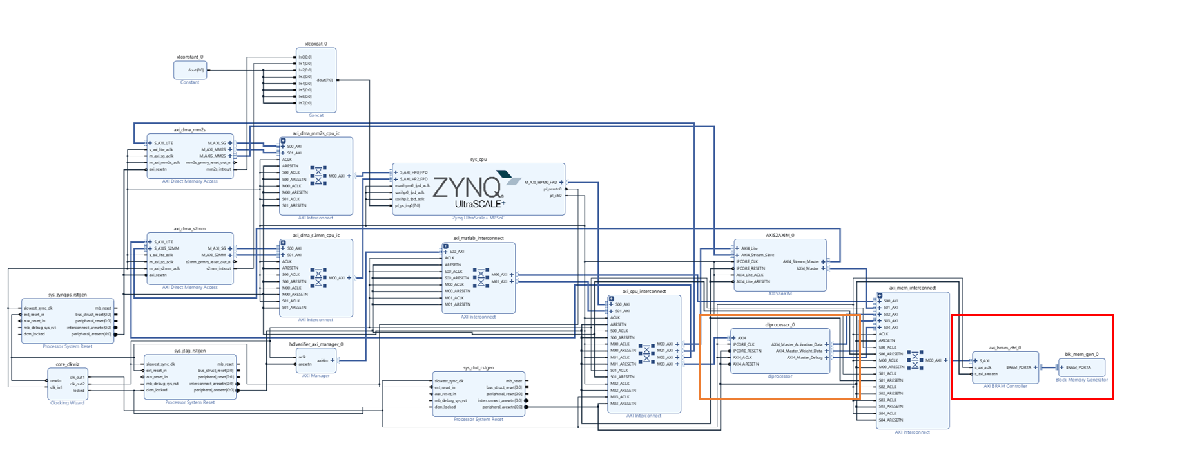
This example uses the Xilinx® ZCU102 SoC board. The board contains these blocks:
System reset block — Used to feed the clock and reset signals to the design.
MATLAB® JTAG AXI Manager block — MATLAB uses this block to access the onboard memory location. For more details, see Set Up AXI Manager (HDL Verifier)
The BRAM IP core integrates with the dlprocessor block. The BRAM IP core is an on-board memory that stores the inputs, weights, activations, and so on that are required for to deploy deep learning networks on FPGAs. For more details, see Deep Learning Processor IP Core Generation for Custom Board

The image shows the generated deep learning processor IP core, dl_processor0, integrated into the reference design.
Prerequisites
Xilinx® ZCU102 SoC development kit.
Deep Learning HDL Toolbox™
Deep Learning HDL Toolbox Support Package for Xilinx FPGA and SoC
Deep Learning Toolbox™
Register Customer Reference Design
Define the interface and attributes of the custom SoC reference design. To create a custom reference design:
Create the reference design definition file. To generate a deep learning processor IP core, you must define these three AXI4 Master Interfaces:
AXI4 Master Activation DataAXI4 Master Weight DataAXI4 Master Debug
function hRD = plugin_rd()
% Reference design definition

%   Copyright 2019-2023 The MathWorks, Inc.

% Construct reference design object
hRD = hdlcoder.ReferenceDesign('SynthesisTool', 'Xilinx Vivado');

hRD.ReferenceDesignName = 'DL Reference Design With BRAM Access';
hRD.BoardName = 'Xilinx Zynq UltraScale+ MPSoC ZCU102 Evaluation Kit';

% Tool information
hRD.SupportedToolVersion = {'2023.1'};

%% Add custom design files
% add custom Vivado design
hRD.addCustomVivadoDesign( ...
    'CustomBlockDesignTcl', 'system_top.tcl');

% Post Create Project Callback function to Improve timing closure
hRD.PostCreateProjectFcn   = @DLZCU102.matlab_libiio_3axi4_master_2019_1.callback_PostCreateProject;

% Add HDL Verifier JTAG as AXI Master IP from support package
msg = message('hdlcommon:plugin:IPRepositoryHDLVerifierXilinxNotFound').getString;
hRD.addIPRepository( ...
	'IPListFunction','hdlverifier.fpga.vivado.iplist', ...
	'NotExistMessage', msg);

% Add AXI4-Stream to AXI4-Master DDR Access IP
hRD.addIPRepository( ...
	'IPListFunction','hdlcoder.fpga.vivado.hdlcoder_axis2axim_iplist', ...
	'NotExistMessage', 'AXI4-Stream to AXI4-Master IP not found.');


%% Add interfaces
% add clock interface
hRD.addClockInterface( ...
    'ClockConnection',     'core_clkwiz/clk_out1', ...
    'ResetConnection',     'sys_dut_rstgen/peripheral_aresetn',...
    'DefaultFrequencyMHz', 50,...
    'MinFrequencyMHz',     5,...
    'MaxFrequencyMHz',     500,...
    'ClockModuleInstance', 'core_clkwiz',...
    'ClockNumber',         1);

% add AXI4 and AXI4-Lite slave interfaces
hRD.addAXI4SlaveInterface( ...
    'InterfaceConnection', 'axi_cpu_interconnect/M03_AXI', ...
    'BaseAddress',         {'0xA0000000','0x00A0000000'}, ...
    'MasterAddressSpace',  {'hdlverifier_axi_manager_0/axi4m','sys_cpu/Data'}, ...
    'InterfaceType',       'AXI4', ...
    'IDWidth',             13);
    %0x00800000
hRD.addAXI4MasterInterface(...
        'InterfaceID',         'AXI4 Master Activation Data', ...
        'ReadSupport',          true, ...
        'WriteSupport',         true, ...
        'MaxDataWidth',         512, ...
        'AddrWidth',            32, ...
        'InterfaceConnection', 'axi_mem_interconnect/S02_AXI',...
        'TargetAddressSegments', {{'axi_bram_ctrl_0/S_AXI/Mem0',hex2dec('C0000000'),hex2dec('200000')}});

hRD.addAXI4MasterInterface(...
        'InterfaceID',         'AXI4 Master Weight Data', ...
        'ReadSupport',          true, ...
        'WriteSupport',         true, ...
        'MaxDataWidth',         512, ...
        'AddrWidth',            32, ...
        'InterfaceConnection', 'axi_mem_interconnect/S03_AXI',...
        'TargetAddressSegments', {{'axi_bram_ctrl_0/S_AXI/Mem0',hex2dec('C0000000'),hex2dec('200000')}});

hRD.addAXI4MasterInterface(...
        'InterfaceID',         'AXI4 Master Debug', ...
        'ReadSupport',          true, ...
        'WriteSupport',         true, ...
        'MaxDataWidth',         512, ...
        'AddrWidth',            32, ...
        'InterfaceConnection', 'axi_mem_interconnect/S04_AXI',...
        'TargetAddressSegments', {{'axi_bram_ctrl_0/S_AXI/Mem0',hex2dec('C0000000'),hex2dec('200000')}});

hRD.DeviceTreeName = 'devicetree_dlhdl.dtb';
2. The reference design plugin file must contain information about the target interface. Deep Learning HDL Toolbox supports both JTAG and Ethernet targets. The base address for the BRAM IP core is 0xC0000000 and the memory depth is 0x00200000.
The file also requires information on the resources consumed by the reference design. Deep Learning HDL Toolbox uses this information during resource estimation. Add the deep learning processor information to the reference design file:
hRD.registerDeepLearningTargetInterface("JTAG");
hRD.registerDeepLearningTargetInterface("Ethernet");
hRD.registerDeepLearningMemoryAddressSpace(0xC0000000, 0x00200000);


hRD.ResourcesUsed.LogicElements = 19624;
hRD.ResourcesUsed.DSP = 0;
hRD.ResourcesUsed.RAM = 565;
Generate Optimized Custom Processor with BRAM Reference Design
Next, you deploy a pretrained deep learning network by generating a custom bitstream. The pretrained network in this example is trained on the Modified National Institute Standards of Technology (MNIST) database[1].
To retrieve the pretrained network at the MATLAB command line, enter:
net = getDigitsNetwork;
analyzeNetwork(net)
Next, create a deep learning processor configuration and optimize the configuration for the pretrained network by using the optimizeConfigurationForNetwork method. For more information on creating an optimized processor, see Optimize Deep Learning Processor Configuration for Network Performance.
hPC = dlhdl.ProcessorConfig;
customhPC = optimizeConfigurationForNetwork(hPC,net);
### Optimizing processor configuration for deep learning network...
### Note: Processing module "conv" property "InputMemorySize" changed from "[227 227 3]" to "[28 28 1]".
### Note: Processing module "conv" property "OutputMemorySize" changed from "[227 227 3]" to "[28 28 8]".
### Note: Processing module "conv" property "FeatureSizeLimit" changed from "2048" to "1024".
### Note: Processing module "conv" property "SegmentationBlockGeneration" changed from "true" to "false".
### Note: Processing module "conv" property "WeightBlockGeneration" changed from "off" to "false".
### Note: Processing module "fc" property "InputMemorySize" changed from "25088" to "1568".
### Note: Processing module "fc" property "OutputMemorySize" changed from "4096" to "128".
### Note: Processing module "fc" property "SoftmaxBlockGeneration" changed from "false" to "true".
### Note: Processing module "custom" property "Identity" changed from "true" to "false".
### Note: Processing module "custom" property "Multiplication" changed from "true" to "false".

                    Processing Module "conv"
                            ModuleGeneration: 'on'
                          LRNBlockGeneration: 'off'
                 SegmentationBlockGeneration: 'off'
                         GELUBlockGeneration: 'off'
                            ConvThreadNumber: 16
                             InputMemorySize: [28 28 1]
                            OutputMemorySize: [28 28 8]
                            FeatureSizeLimit: 1024

                      Processing Module "fc"
                            ModuleGeneration: 'on'
                      SoftmaxBlockGeneration: 'on'
                         GELUBlockGeneration: 'off'
                              FCThreadNumber: 4
                             InputMemorySize: 1568
                            OutputMemorySize: 128

                  Processing Module "custom"
                            ModuleGeneration: 'on'
                                    Addition: 'on'
                                   MishLayer: 'off'
                              Multiplication: 'off'
                                    Resize2D: 'off'
                                     Sigmoid: 'off'
                                  SwishLayer: 'off'
                                   TanhLayer: 'off'
                             InputMemorySize: 40
                            OutputMemorySize: 120

              Processor Top Level Properties
                              RunTimeControl: 'register'
                               RunTimeStatus: 'register'
                          InputStreamControl: 'register'
                         OutputStreamControl: 'register'
                                SetupControl: 'register'
                           ProcessorDataType: 'single'
                            UseVendorLibrary: 'on'
                     LayerNormalizationBlock: 'off'

                     System Level Properties
                              TargetPlatform: 'Xilinx Zynq UltraScale+ MPSoC ZCU102 Evaluation Kit'
                             TargetFrequency: 200
                               SynthesisTool: 'Xilinx Vivado'
                             ReferenceDesign: 'AXI-Stream DDR Memory Access : 3-AXIM'
                     SynthesisToolChipFamily: 'Zynq UltraScale+'
                     SynthesisToolDeviceName: 'xczu9eg-ffvb1156-2-e'
                    SynthesisToolPackageName: ''
                     SynthesisToolSpeedValue: ''

### Optimizing processor configuration for deep learning network complete.
Modify the ReferenceDesign property of the optimized processor configuration to use the BRAM based custom reference design.
customhPC.ReferenceDesign = 'DL Reference Design With BRAM Access';Generate a bitstream for the optimized custom processor configuration. First, set the Xilinx Vivado® toolpath by using the hdlsetuptoolpath function and generate the custom bitstream by using the dlhdl.buildProcessor function.
hdlsetuptoolpath('ToolName', 'Xilinx Vivado', 'ToolPath', 'C:\Xilinx\Vivado\2023.1\bin\vivado.bat');
dlhdl.buildProcessor(customhPC);
Locate the bitstream file and associated MAT file at cwd\dlhdl_prj\, where cwd is your current working folder. The name of the bitstream file is dlprocessor.bit, and the name of the MAT file is dlprocessor.mat. To use the generated bitstream for the supported Xilinx boards, copy the dlprocessor.bit and dlprocessor.mat files to the top level of the current working folder.

Deploy the Custom Bitstream and Run Predictions on the Network
After you generate the bitstream, deploy the network and run the predictions on the network. For example, see the Get Started with Deep Learning FPGA Deployment on Xilinx ZCU102 SoC example. This example uses the JTAG target interface.
hTarget = dlhdl.Target('Xilinx','Interface','JTAG');
hW = dlhdl.Workflow('network', net, 'Bitstream', 'dlprocessor.bit','Target',hTarget);
hW.compile;
hW.deploy
Retrieve the FPGA utilization by using the getBuildInfo method. Store the results in the area variable.
area = hW.getBuildInfo
Run Prediction on Example Image
Load the example image.
inputImg = imread('five_28x28.pgm');
Run a prediction on the image and display the prediction result.
prediction = hW.predict(single(inputImg),'Profile','on');
[~, idx] = max(prediction);
fprintf('The prediction result is %d\n', idx-1);
Bibliography
LeCun, Y., C. Cortes, and C. J. C. Burges. "The MNIST Database of Handwritten Digits." https://yann.lecun.com/exdb/mnist/.
See Also
dlhdl.ProcessorConfig | dlhdl.buildProcessor | optimizeConfigurationForNetwork