View Image Sequences in Video Viewer
This section describes how to use the Video Viewer app to view image sequences and provides information about configuring the app.
Open Data in Video Viewer
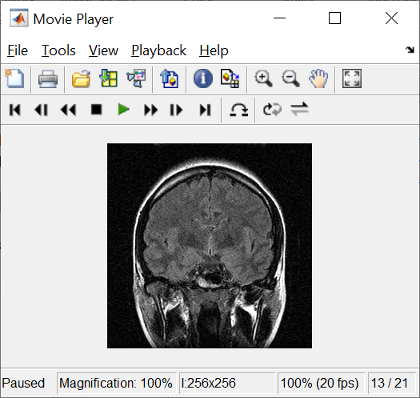
This example shows how to view multi-slice volumetric data in Video Viewer.
Load the image sequence into the MATLAB® workspace. For this example, load the MRI data from the file
mristack.mat, which is included in the imdata
folder. This creates a variable named mristack in your workspace. The
variable is an array of 21 grayscale frames containing MRI images of the brain. Each
frame is a 256-by-256 array of uint8 data.
load mristackmristack 256x256x21 1276256 uint8
Click Video Viewer in the apps gallery and select the Import
from workspace option on the File menu. You can also call
implay, specifying the name of the image sequence variable as an
argument.
implay(mristack)
Video Viewer opens, displaying the first frame of the image sequence. Note how Video Viewer displays information about the image sequence, such as the size of each frame and the total number of frames, at the bottom of the window.
Explore Image Sequence Using Playback Controls
To view the image sequence or video as an animation, click the Play button
![]() in the Playback toolbar, select
Play from the Playback menu, or press P or the
Space bar. By default, Video Viewer plays the image sequence forward, once in its
entirety, but you can view the frames in the image sequence in many ways, described in this
table. As you view an image sequence, Video Viewer updates the Status Bar at the
bottom of the window.
in the Playback toolbar, select
Play from the Playback menu, or press P or the
Space bar. By default, Video Viewer plays the image sequence forward, once in its
entirety, but you can view the frames in the image sequence in many ways, described in this
table. As you view an image sequence, Video Viewer updates the Status Bar at the
bottom of the window.
| Viewing Option | Playback Control | Keyboard Shortcut |
|---|---|---|
| Specify the direction in which to play the image sequence. | Click the Playback mode button | A |
| View the sequence repeatedly. | Click the Repeat button | R |
| Jump to a specific frame in the sequence. | Click the Jump to button | J |
| Stop the sequence. | Click the Stop button | S |
| Step through the sequence, one frame at a time, or jump to the beginning or end of the sequence (rewind). | Click one of the navigation buttons | Arrow keys Page Up/Page Down L (last frame) F (first frame) |
Examine Frame More Closely
Video Viewer supports several tools listed in the Tools menu and on the Toolbar that you can use to examine the frames in the image sequence more closely.
| Viewing Option | Playback Control |
|---|---|
| Zoom in or out on the image, and pan to change the view. | Click one of the zoom buttons |
| Examine an area of the current frame in detail. | Click the Pixel region button |
| Export frame to Image Viewer | Click the Export to Image Viewer button |
Specify Frame Rate
To decrease or increase the playback rate, select Frame Rate from the Playback menu, or use the keyboard shortcut T. The Frame Rate dialog box displays the frame rate of the source, lets you change the rate at which Video Viewer plays the image sequence or video, and displays the actual playback rate. The playback rate is the number of frames that Video Viewer processes per second.

If you want to increase the actual playback rate, but your system's hardware cannot keep up with the desired rate, select the Allow frame drop to achieve desired playback rate check box. This parameter enables Video Viewer to achieve the playback rate by dropping frames. When you select this option, the Frame Rate dialog box displays several additional options that you can use to specify the minimum and maximum refresh rates. If your hardware allows it, increase the refresh rate to achieve a smoother playback. However, if you specify a small range for the refresh rate, the computed frame replay schedule may lead to a choppy replay, and a warning will appear.
Specify Colormap
To specify the colormap to apply to the intensity values, select Colormap from the Tools menu, or use the keyboard shortcut C. Video Viewer displays a dialog box that enables you to change the colormap.
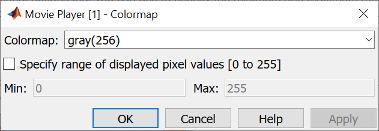
Use the Colormap parameter to specify a particular colormap.
If you know that the pixel values do not use the entire data type range, you can select the Specify range of displayed pixel values check box and enter the range for your data. The dialog box automatically displays the range based on the data type of the pixel values.
Get Information about an Image Sequence
To view basic information about the image data, click the Video Information button
![]() in the toolbar or select Video
Information from the Tools menu. Video Viewer displays a dialog
box containing basic information about the image sequence, such as the size of each frame,
the frame rate, and the total number of frames.
in the toolbar or select Video
Information from the Tools menu. Video Viewer displays a dialog
box containing basic information about the image sequence, such as the size of each frame,
the frame rate, and the total number of frames.

Configure Video Viewer App
The Configuration dialog box enables you to change the appearance and behavior of the player. To open the Configuration dialog box, select File > Configuration > Edit. To load a preexisting configuration set, select File > Configuration > Load.
The Configuration dialog box contains four tabs: Core, Sources, Visuals, and Tools. On each tab, select a category and then click Properties to view configuration settings.

The following table lists the options that are available for each category on every pane.
| Pane | Option Category | Option Descriptions |
|---|---|---|
| Core | General UI | Display the full path check box — Select to display the full path to the video data source in the title bar. By default, Video Viewer displays a shortened name in the title bar. |
| Core | Source UI | Keyboard commands respect playback mode check box
— Select to make keyboard shortcut keys aware of your playback mode
selection. If you clear this check box, the keyboard shortcut keys behave as if
the playback mode is set to Forward play and
Repeat is set to
Recently used sources list parameter — Specifies the number of sources listed in the File menu. |
| Sources | File | Default open file path parameter — Specify the directory that is displayed in the Connect to File dialog box when you click File > Open. |
| Sources | Workspace | There are no options associated with this selection. |
| Sources | Simulink | Load Simulink model if not open check box — You must have Simulink installed. Connect scope on selection of: — Signal lines only or signal lines and blocks. You must have Simulink installed. |
| Visuals | Video | There are no options associated with this selection. |
| Tools | Instrumentation Sets | There are no options associated with this selection. |
| Tools | Image Viewer | Open new Image Viewer app for each export check box — Opens a new Image Viewer for each exported frame. |
| Tools | Pixel Region | There are no options associated with this selection. |
| Tools | Image Navigation Tools | There are no options associated with this selection. |
Save Image Viewer App Configuration Settings
To save your configuration settings for future use, select File > Configuration Set > Save as.
Note
By default, Video Viewer uses the configuration settings from the file
implay.cfg. If you want to store your configuration settings in
this file, you should first create a backup copy of the file.
See Also
Video Viewer | Volume Viewer | Image Viewer | montage