Create Informal Tables
A DOM API informal table has only a body. It does not have separate header or footer sections. By contrast, a DOM API formal table has separate header, body, and footer sections. You can format one or more rows of an informal table to look like a header or footer. However, if your table header or footer has multiple rows, consider using a formal table. See Create Formal Tables. For information about other types of tables that you can create in reports, see Choose Type of Table to Create.
An informal table is represented by an mlreportgen.dom.Table object. Table rows and entries are represented by mlreportgen.dom.TableRow and mlreportgen.dom.TableEntry objects,
respectively.
You can create an informal table from a MATLAB® array. This approach is the simplest because you do not have to create
TableRow and TableEntry objects. You can also create an informal
table by building the table from TableRow and TableEntry objects.
This approach is useful for complex formatting requirements, such as an when an entry spans
multiple columns or rows.
For information about formatting tables, see Format Tables.
Create Informal Tables from MATLAB Arrays
You can create a table by appending a two-dimensional numeric array, categorical array, or
cell array to a document. A cell array can contain MATLAB data and DOM objects. See the array input argument on the mlreportgen.dom.Table reference page. The append method converts
an array to an mlreportgen.dom.Table object, appends it to the document, and
returns the Table object, which you can then format. You can also create a
Table object directly by providing the array to the
Table constructor.
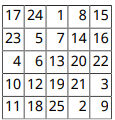
This example creates a table from a numeric array. The example uses Table
format properties to specify the table border, the row and column separators, and the
alignment and margin of the entries.
import mlreportgen.dom.*;
d = Document('myTableReport','pdf');

t = append(d,magic(5));
t.Border = 'single';
t.ColSep = 'single';
t.RowSep = 'single';
t.TableEntriesHAlign = 'right';
t.TableEntriesVAlign = 'middle';
t.TableEntriesInnerMargin = '2pt';

close(d);
rptview(d);
Here is the table in the generated report.
Build Informal Tables from Rows and Entries
You can create an informal table by creating mlreportgen.dom.TableEntry
objects, appending them to mlreportgen.dom.TableRow objects, and appending
the mlreportgen.dom.TableRow objects to an
mlreportgen.dom.Table object. For an example, see Span a Table Entry Across Rows and Columns.
See Also
mlreportgen.dom.Table | mlreportgen.dom.TableRow | mlreportgen.dom.TableEntry
Related Topics
You can also select a web site from the following list:
Americas
- América Latina (Español)
- Canada (English)
- United States (English)
Europe
- Belgium (English)
- Denmark (English)
- Deutschland (Deutsch)
- España (Español)
- Finland (English)
- France (Français)
- Ireland (English)
- Italia (Italiano)
- Luxembourg (English)
- Netherlands (English)
- Norway (English)
- Österreich (Deutsch)
- Portugal (English)
- Sweden (English)
- Switzerland
- United Kingdom (English)