MQTT Basics
MQTT is a publish/subscribe architecture that is developed primarily to connect bandwidth and power-constrained devices over wireless networks. It is a simple and lightweight protocol that runs over TCP/IP sockets or WebSockets. MQTT over WebSockets can be secured with SSL. The publish/subscribe architecture enables messages to be pushed to the client devices without the device needing to continuously poll the server.
The MQTT broker is the central point of communication, and it is in charge of dispatching all messages between the senders and the rightful receivers. A client is any device that connects to the broker and can publish or subscribe to topics to access the information. A topic contains the routing information for the broker. Each client that wants to send messages publishes them to a certain topic, and each client that wants to receive messages subscribes to a certain topic. The broker delivers all messages with the matching topic to the appropriate clients.
ThingSpeak™ has an MQTT broker at the URL mqtt3.thingspeak.com and
port 1883. The ThingSpeak broker supports both MQTT publish and MQTT subscribe as shown in the
following diagrams.
MQTT Publish
This figure describes the topic structure. The broker acknowledges a correct
CONNECT request with CONNACK.

MQTT Subscribe
This figure describes the topic structure. The broker acknowledges a correct
SUBSCRIBE request with SUBACK.

Create a ThingSpeak MQTT Device
MQTT access to your channels, including credentials, is handled by a ThingSpeak MQTT device. Your device is configured with the credentials necessary for your MQTT client to communicate with ThingSpeak, and for authorizing specific channels. Use the following steps to create an MQTT device.
In the ThingSpeak menu click Devices > MQTT.

On the MQTT Devices page, click Add a new device.

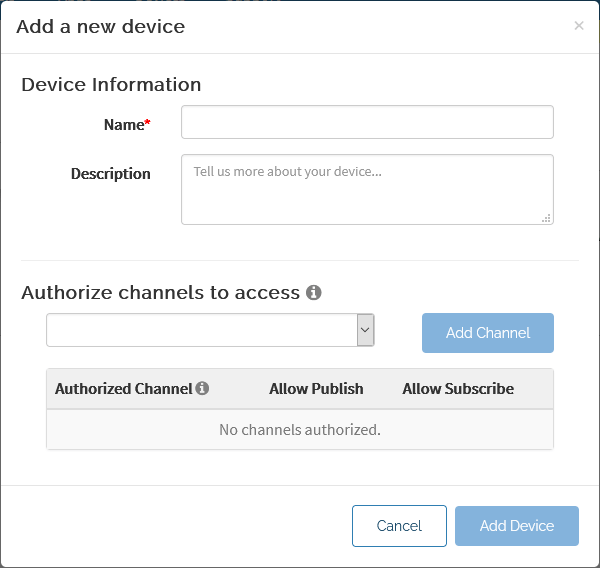
Fill in the Add a new device dialog:

Provide a device name.
Provide an optional description.
In the Authorize Channels section, choose a channel from the list menu, then click Add Channel. Repeat this until you have all the channels you want connected to the device in the Authorized Channel list. Set each to allow publish and allow subscribe as needed.
Click Add Device.
At this point, ThingSpeak generates a list of credentials for your device that includes client ID, username, and password. You can view and copy these items from this page, or click Download Credentials to save the credentials in a local file. Important: Record or save your credentials now, as you will not get another opportunity to view or save the password.
Click Done to complete the device creation.
Your new device now appears on the MQTT Devices page. You can alter your device settings and add channels to it by clicking Edit. You can use the client ID, username, and password in your MQTT client to access your ThingSpeak MQTT device for publishing and subscribing to its channels.
Note
You can have up to 100 MQTT devices per user, with a maximum of 10 authorized channels per device. If you require more devices or channels, Contact Support.
For information on using a desktop MQTT client, see Publish and Subscribe to a Channel Using Desktop MQTT Client.
Device Password Reset. If you need to reset your device password at any time, you can reset it from the device edit page:
Select Devices > MQTT.
In the displayed list of your MQTT devices, for the device you want to reset, click Edit to view its configuration details.
In the MQTT Credentials section, click the regenerate icon to reset the password. Connections using the old password will be disabled.

Server Response for Connections
If the connection is successful, the ThingSpeak MQTT broker responds with a connection acknowledgment,
CONNACK. The MQTT broker responds to a successful
subscription request with a SUBACK message and relays any new
data posted to the subscribed channel or field to the client. To learn more about
these messages, see MQTT v3.1.1 specification. You can then publish messages to topics using
the form Publish to a Channel Feed or Publish to a Channel Field Feed.
MQTT Client Configuration
ThingSpeak has an MQTT broker at the URL mqtt3.thingspeak.com.
Configure your MQTT client to communicate with the ThingSpeak MQTT broker based on one of the following options:
Port | Connection Type | Encryption |
|---|---|---|
1883 | TCP | None |
8883 | TCP | TLS/SSL |
80 | WebSocket | None |
443 | WebSocket | TLS/SSL |
When configuring your client connection, consider the following:
If your hardware supports secure SSL socket connection mode, use that mode to communicate with the ThingSpeak MQTT broker whenever possible.
ThingSpeak implements MQTT publish and subscribe functionality with
QoS=0. This "fire-and-forget" protocol means that your client does not receive an acknowledgment when you publish to a ThingSpeak channel.MQTT connections time out after one hour of idleness.
When using a WebSocket connection the required path is
/mqtt.Using the Paho library with Python® on Raspberry Pi®, the default MQTT path is
"/mqtt", but you can also set this with the code line:client.ws_set_options("/mqtt")With the HiveMQ MQTT CLI, you set the path with the command option:
mqtt pub … -ws -ws:path /mqtt …
See Also
Publish to a Channel Feed | Publish to a Channel Field Feed | Subscribe to a Channel Field Feed | Subscribe to a Channel Feed
Topics
- Troubleshoot MQTT Publish
- MQTT API
- Publish and Subscribe to a ThingSpeak Channel Using Secure MQTT
- Publish and Subscribe to a Channel Using Desktop MQTT Client
- Publish to a ThingSpeak Channel Using a Particle Device Client via MQTT
- Publish Using WebSockets in Python on a Raspberry Pi
- Use Particle Photon Client to Subscribe to Channel Updates
- Troubleshoot MQTT Subscribe
- Use Particle Photon Client to Subscribe to Channel Updates