Apply Labels to Unreal Scene Elements for Semantic Segmentation and Object Detection
The Simulation 3D Camera block provides an option to output semantic segmentation data from an Unreal® scene. If you add new scene elements, or assets, to a custom scene, then you must apply the correct ID to that element in the Unreal Editor. This ID is known as a stencil ID. Without the correct stencil ID applied, the Simulation 3D Camera block does not recognize the scene element and does not display semantic segmentation data for it.
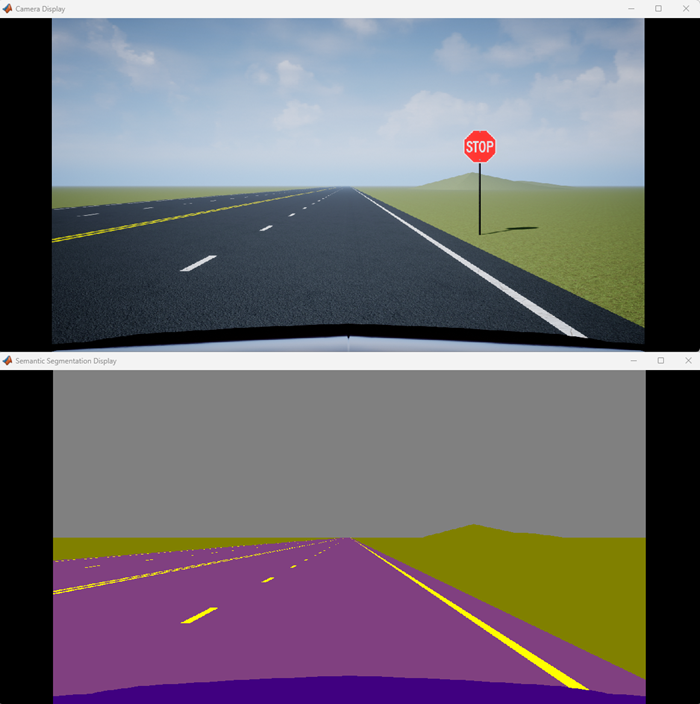
For example, this Camera Display window shows a stop sign that was added to a custom scene. The Semantic Segmentation Display window does not display the stop sign, because the stop sign is missing a stencil ID.
You can also use these stencil ID labels to assign IDs to objects detected by probabilistic sensors, such as those modeled by the Simulation 3D Probabilistic Radar and Simulation 3D Vision Detection Generator blocks.
To apply a stencil ID label to a scene element in Unreal Editor:
Open the Unreal Editor from a Simulink® model that is configured to simulate in the 3D environment. For more details, see Customize Scenes Using Simulink and Unreal Editor.
In the editor window, select the scene element with the missing stencil ID.
On the Details pane on the right, in the Rendering section, select Render CustomDepth Pass.
If you do not see this option, expand Advanced and click the Show Advanced
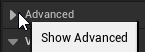 to show all rendering options.
In the CustomDepth Stencil Value box, enter the stencil ID that corresponds to the asset. If you are adding an asset to a scene from the Automated Driving Toolbox™ Interface for Unreal Engine® Projects support package, then enter the stencil ID that corresponds to that asset type, as shown in the table. If you are adding assets other than the ones shown, then you can assign them to unused IDs. If you do not assign a stencil ID to an asset, then the Unreal Editor assigns that asset an ID of
0.The table lists the stencil IDs assigned to the scene elements in the prebuilt scenes. For example, for a stop sign that is missing a stencil ID, enter 13.
ID Type 0None/default
1Building
2Not used
3Other
4Pedestrians
5Pole
6Lane markings
7Road
8Sidewalk
9Vegetation
10Vehicle
11Not used
12Generic traffic sign
13Stop sign
14Yield sign
15Speed limit sign
16Weight limit sign
17-18Not used
19Left and right arrow warning sign
20Left chevron warning sign
21Right chevron warning sign
22Not used
23Right one-way sign
24Not used
25School bus only sign
26-38Not used
39Crosswalk sign
40Not used
41Traffic signal
42Curve right warning sign
43Curve left warning sign
44Up right arrow warning sign
45-47Not used
48Railroad crossing sign
49Street sign
50Roundabout warning sign
51Fire hydrant
52Exit sign
53Bike lane sign
54-56Not used
57Sky
58Curb
59Flyover ramp
60Road guard rail
61 Bicyclist 62-66Not used
67Deer
68-70Not used
71Barricade
72Motorcycle
73-255Not used
Tip
If you are adding stencil ID for scene elements of the same type, you can copy (Ctrl+C) and paste (Ctrl+V) the element with the added stencil ID. The copied scene element includes the stencil ID.
Visually verify that the correct stencil ID shows by using the custom stencil view. In the top-left corner of the editor window, click
 and select Buffer Visualization > Custom Stencil. The scene displays the stencil ID specified for each scene element.
For example, if you added the correct stencil ID to a stop sign
(
and select Buffer Visualization > Custom Stencil. The scene displays the stencil ID specified for each scene element.
For example, if you added the correct stencil ID to a stop sign
(13), then in the editor window, the stop sign displays a stencil ID value of13.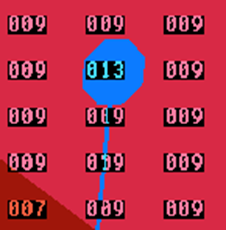
If you do not set a stencil ID value for a scene element, then the element appears in black and displays no stencil ID.
If you do not select CustomDepth Stencil Value, then the scene element does not appear in this view.
Turn off the custom stencil ID view. In the top-left corner of the editor window, click Buffer Visualization, and then select Lit.
To display semantic segmentation data for your custom labels:
Set up your Simulink model to display semantic segmentation data from a Simulation 3D Camera block. For an example setup, see Depth and Semantic Segmentation Visualization Using Unreal Engine Simulation.
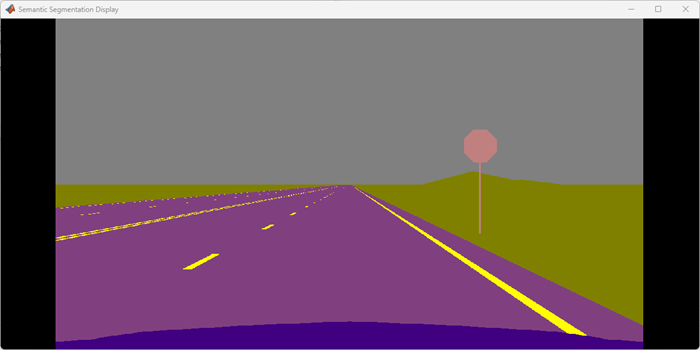
Run the simulation and verify that the Simulation 3D Camera block outputs the correct data. For example, this Semantic Segmentation Display window shows the correct stencil ID applied to a stop sign.
See Also
Simulation 3D Camera | Simulation 3D Scene Configuration | Simulation 3D Vision Detection Generator | Simulation 3D Probabilistic Radar | Simulation 3D Probabilistic Radar Configuration