Segment Lungs from 3-D Chest Scan
This example shows how to perform a 3-D segmentation using active contours (snakes) using seed points from two 2-D slices of the volume.
Active contours is a region growing algorithm that requires initial seed points. The example uses the Image Segmenter app to create this seed mask by segmenting two orthogonal 2-D slices, one in the XY plane and the other in the XZ plane. The example then inserts these two segmentations into a 3-D mask. The example passes this mask to the activecontour function to create a 3-D segmentation of the lungs in the chest cavity. (This example uses the active contour method but you could use other segmentation techniques to accomplish the same goal, such as flood-fill.)
Prepare the Data
Download the human chest CT scan data. The size of the data is 89 MB.
zipFile = "chestVolume.zip";
if ~isfile(zipFile)
    downloadURL = "https://ssd.mathworks.com/supportfiles/image/"+zipFile;
    websave(zipFile,downloadURL);
    unzip(zipFile);
end
Load the human chest CT scan data into the workspace.
load chestVolume
whos V
  Name        Size                     Bytes  Class    Attributes

  V         512x512x318            166723584  int16
Convert the CT scan data from int16 to single to normalize the values to the range [0, 1].
V = im2single(V);
View the chest scans using the Volume Viewer app.
volumeViewer(V)
Volume Viewer has preset alphamaps that are intended to provide the best view of certain types of data. To get the best view of the chest scans, select the ct-bone preset.

Segment the Lungs
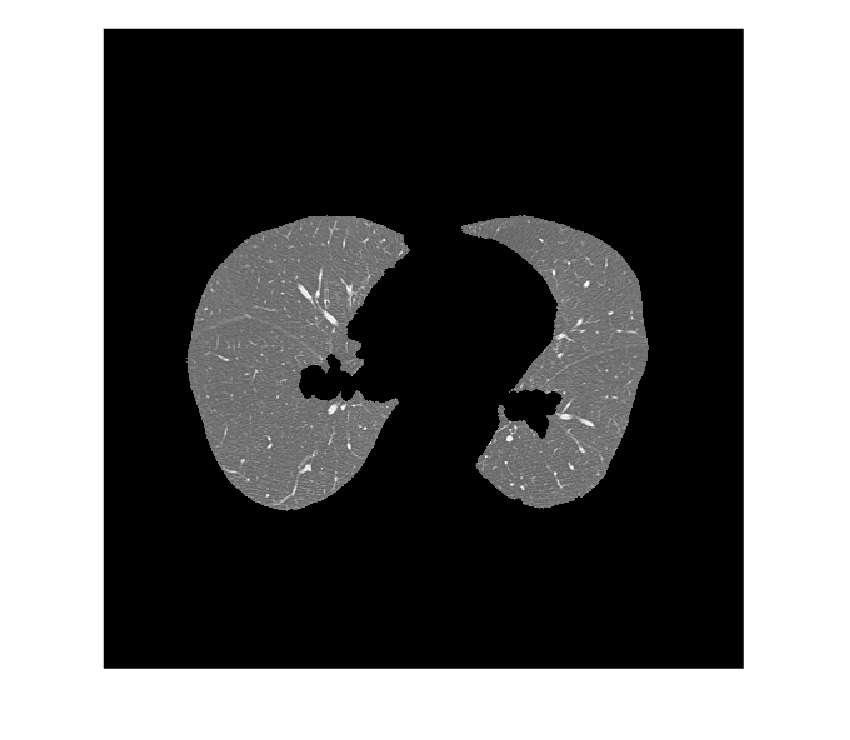
Extract the center slice in both the XY and XZ dimensions.
XY = V(:,:,160);
XZ = squeeze(V(256,:,:));
View the 2-D slices using the imshow function.
figure
imshow(XY,[],Border="tight")
imshow(XZ,[],Border="tight")
You can perform the segmentation in the Image Segmenter app. Open the app using the imageSegmenter command, specifying a 2-D slice as the input argument. If the app prompts you to rescale the display range, select yes.
imageSegmenter(XY)
To start the segmentation process, navigate to the Segmentation Tools dropdown menu and select Threshold. The app opens the lung slide in the Threshold tab. By default, the app applies a global threshold (see the imbinarize function for more information about the global threshold). For the XY slice, the global threshold does not delineate between the lungs and background. Instead, select the Manual Threshold option and move the Threshold slider. After you identify a threshold value that achieves a good segmentation of the lungs, accept the threshold by selecting Create Mask. Return the Segmentation tab.

This code reproduces the operations that the app uses to adjust the image contrast and threshold the image.
XY = imadjust(XY);
BW = XY > 0.6;
After the initial lung segmentation, refine the mask. Mask refinement tools are available when you navigate to the Segmentation Tools dropdown menu, under the Refine Mask menu.

In the app, perform these operations to refine the lung segmentation.
Invert the mask image by using the Invert Mask option. After inverting the mask, the lungs are in the foreground
Remove other segmented elements besides the lunchs by using the Clear Borders option.
Fill holes inside the lung segmentation by using the Fill Holes option.
Smooth the edges of the lung segmentation by using the Morphology option. The app opens the Morphology tab. Select the Erode Mask operation, then apply the operation by selecting Apply. Close the Morphology tab.
The app shows a preview of the refined mask in yellow over the original image.

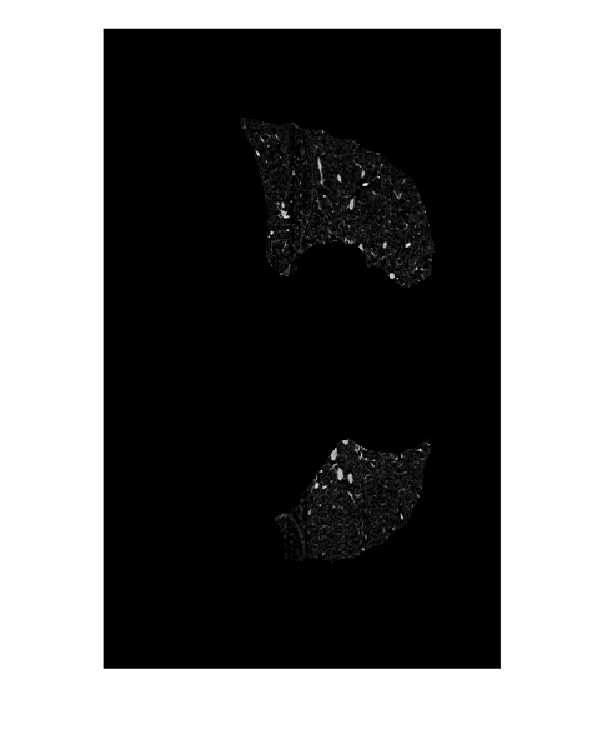
After performing these steps, select Show Binary. Then, export the mask image to the workspace by selecting Export Images under the Export menu.
This code reproduces the operations that the app uses to refine the mask.
BW = imcomplement(BW); % Invert mask
BW = imclearborder(BW); % Clear borders
BW = imfill(BW,"holes"); % Fill holes

% Erode mask with default settings
radius = 3;
decomposition = 0;
se = strel("disk",radius,decomposition);
BW = imerode(BW,se);

% Create masked image
maskedImageXY = XY;
maskedImageXY(~BW) = 0;
Display the masked image.
imshow(maskedImageXY)
Segment the XZ slice using a similar set of operations. Using Load Image, select the XZ variable. As before, use thresholding to perform the initial segmentation of the lungs. For the XZ slice, the default Global Threshold option creates an adequate segmentation.
This code reproduces the operations that the app uses to adjust the image contrast and threshold the image.
XZ = imadjust(XZ);
BW = imbinarize(XZ);
Refine the segmentation of the lungs by using the options on the Refine Mask menu. Follow the same order of operations as when refining the XY slice. In the erosion operation on the Morphology tab, specify a radius of 13 to remove small extraneous objects. After performing these steps, select Show Binary. Then, export the mask image to the workspace by selecting Export Images under the Export menu.
This code reproduces the operations that the app uses to refine the mask.
BW = imcomplement(BW); % Invert mask
BW = imclearborder(BW); % Clear borders
BW = imfill(BW,"holes"); % Fill holes

% Erode mask with a structuring element with radius 13
radius = 13;
decomposition = 0;
se = strel("disk",radius,decomposition);
BW = imerode(BW,se);

% Create masked image
maskedImageXZ = XZ;
maskedImageXZ(~BW) = 0;
Display the masked image.
imshow(maskedImageXZ,[])
Create Seed Mask and Segment Lungs Using activecontour
Create the 3-D seed mask. The seed mask is a logical 3-D volume of the same size as the input volume. The seed mask is true wherever mask_XY and mask_XZ are true.
mask = false(size(V));
mask(:,:,160) = maskedImageXY;
mask(256,:,:) = mask(256,:,:)|reshape(maskedImageXZ,[1 512 318]);
Using this 3-D seed mask, segment the lungs in the 3-D volume using the active contour method. This operation can take a few minutes. To get a quality segmentation, use histeq to spread voxel values over the available range.
V = histeq(V);
BW = activecontour(V,mask,100,"Chan-Vese");
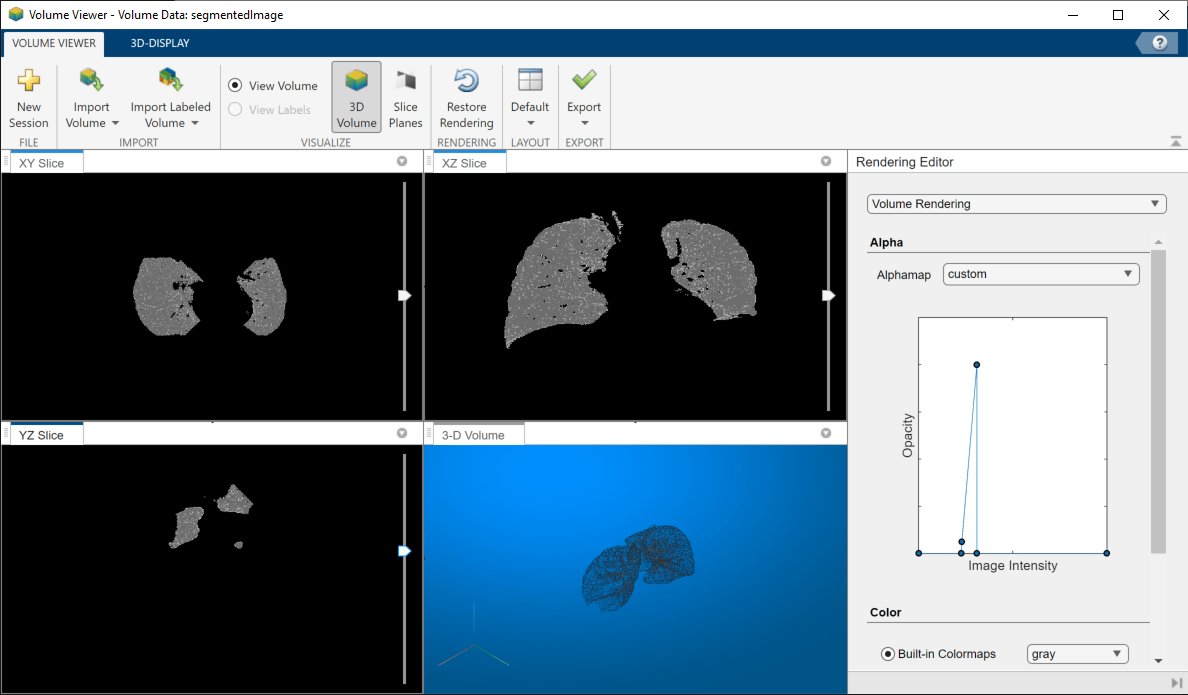
segmentedImage = V.*single(BW);View the segmented lungs in the Volume Viewer app.
volumeViewer(segmentedImage)
By manipulating the alphamap settings in the Rendering Editor, you can get a good view of just the lungs.
Calculate the Volume of the Segmented Lungs
Calculate the volume of the lungs by using the regionprops3 function with the "volume" option.
volLungsPixels = regionprops3(logical(BW),"volume");Specify the spacing of the voxels in the x, y, and z dimensions, which was gathered from the original medical file. The image data in the downloaded MAT file does not include this metadata.
spacingx = 0.76;
spacingy = 0.76;
spacingz = 1.26*1e-6;
unitvol = spacingx*spacingy*spacingz;

volLungs1 = volLungsPixels.Volume(1)*unitvol;
volLungs2 = volLungsPixels.Volume(2)*unitvol;
volLungsLiters = volLungs1 + volLungs2
volLungsLiters =
5.7810