Log Data in Image Acquisition Explorer
You can use the Image Acquisition Explorer to save acquired image data to a file or as a workspace variable. If you want to save your image data to a file, you can specify the file format and configure other file settings.
After you specify your data logging options, you can capture image snapshots and record video. For more information, see Preview and Acquire Data in Image Acquisition Explorer.
Log Data to Workspace
To save image data as a workspace variable, select the Workspace Variable option in the Logging section of the app toolstrip. You can specify the variable name as a valid MATLAB® variable name that does not already exist in the workspace.

The default values are snapshot1 and
recording1 for Image
and Video, respectively. After you capture a
snapshot or record a video using those variables, the default
variable names update to snapshot2 or
recording2, then
snapshot3 or
recording3, and so on.
After you set your variable names, you can click the Capture button to save image data to the workspace or the Record button to save video data to the workspace. For more information, see Preview and Acquire Data in Image Acquisition Explorer.
Log Data to File
To save image data to file, select the File option in the Logging section of the app toolstrip. You can then specify file names and additional configuration settings for Image and Video logging.
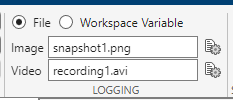
Image Data
In the Image field, specify the name you
want to give the file. The default value is
snapshot1.png. Click the settings
icon next to the file name to configure additional file
settings. You can Select Image File
Location and select an Image
File Format. Available settings depend on
the specified file format.

If you select PNG, you can specify
the following.
Description — Add description to image.
If you select TIFF, you can specify
the following.
Compression — Select compression scheme as
packbits,none,lzw, ordeflate.Description — Add description to image.
If you select JPEG, you can specify
the following.
Quality — Specify quality of output file from 0 to 100, where 0 is lower quality and higher compression and 100 is higher quality and lower compression. The default value is
75.Bit Depth — Select number of bits per pixel as
8or12.Comment — Add comment to image.
After you specify the file name, location, and other settings, you can click the Capture button to save image data to file. For more information, see Preview and Acquire Data in Image Acquisition Explorer.
Video Data
In the Video field, specify the name you
want to give the file. The default value is
recording1.avi. Click the
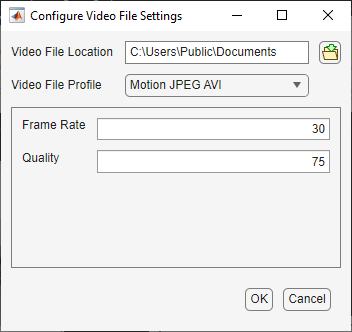
settings icon next to the file name to configure additional
file settings. You can select a Video File
Location and a Video File
Profile. Possible values for
Video File Profile are
Archival,
Motion JPEG AVI,
MPEG-4,
Motion JPEG 2000, and
Uncompressed AVI.
Available settings depend on the specified file
profile.
If you select Archival or
Motion JPEG 2000, you can
specify the following.
Lossless Compression — Turn on to make decompressed data identical to input data. The default is off for the
Motion JPEG 2000profile, and on for theArchivalprofile.Compression Ratio — Specify the target ratio between number of bytes in the input image and number of bytes in the compressed image as a number greater than 1. The default value is
10. You can modify this setting only if Lossless Compression is turned off.Frame Rate — Specify the rate of video playback in frames per second. The default value is
30.MJ2 Bit Depth — Select the number of least-significant bits in input image data as a number from 1 to 16.
If you select Motion JPEG AVI or
MPEG-4, you can specify
the following.
Frame Rate — Specify rate of video playback in frames per second. The default value is
30.Quality — Specify quality of output file from 0 to 100, where 0 is lower quality and higher compression and 100 is higher quality and lower compression. The default value is
75.
If you select Uncompressed AVI, you
can specify the following.
Frame Rate — Specify rate of video playback in frames per second. The default value is
30.
After you specify the file name, location, and other settings, you can click the Record button to save video data to file. For more information, see Preview and Acquire Data in Image Acquisition Explorer.
Note
If the value of the frame rate specified in the video file settings is different from the frame rate of the preview, the length of the saved video will be different from the specified number of seconds for finite recording. The number of frames saved in the recording is calculated from the frame rate of the preview multiplied by the specified number of seconds to record. (The specified amount of time to record also includes the time required for the acquisition to start.) The length of the saved video is the number of frames divided by the frame rate specified in the video file settings. For example, if the frame rate of the preview is 15 frames per second, the number of seconds to record is 20 seconds, and the frame rate of video playback is 30 frames per second, the length of the saved recording is approximately 10 seconds.