Fill Feature Lookup Tables
R2026bUse the Feature Fill Wizard to fill and optimize the values in tables by reference to the model or data. You can fill multiple tables at once using the wizard, and you can Fill from the top feature node or from any table node in a feature. Use Fill at the top feature node to calibrate the entire feature, that is, fill all the table values by referring to a model.
Before using the Feature Fill wizard:
Your project must contain a feature and a model or a data set.
Initialize your tables, unless you imported your strategy with tables already initialized.
Filling and Optimizing Lookup Table Values
When filling a feature table, the Feature Fill Wizard optimizes the table values to minimize the total square error between the feature values and the model. This routine optimizes the fit between your strategy and your model. Using Fill places values into your table. The optimization process shifts the cell values up and down to minimize the overall error between the interpolation between the model and the strategy.
To fill feature tables:
Select Feature > Fill Feature to open the Feature Fill Wizard.
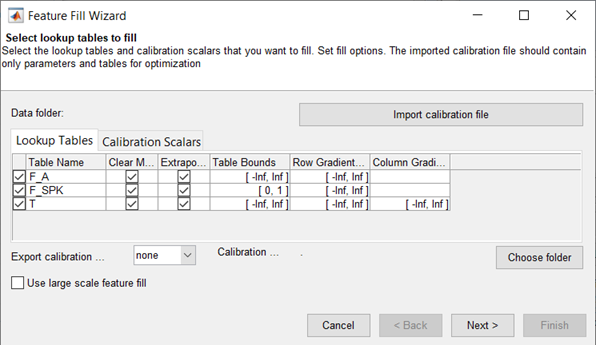
Select tables to fill. Select the check boxes of the tables you want to fill. For each table, you can set these options.
Option Description Bounds
Set bounds on the table values.
The overall bounds take precedence over relative bounds.
Row Gradient Bounds
Column Gradient Bounds
Page Gradient Bounds
Set bounds on the gradient (slope) between adjacent table values along each dimension, including rows, columns, and, for 3-D lookup tables, the third (page) dimension. For example, entering
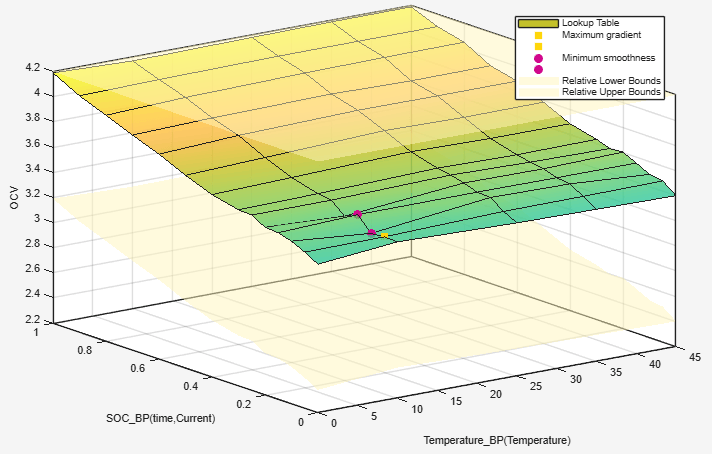
0 Infin the left edit box imposes the constraint that the gradient must be positive (increasing) between successive rows.Relative Bounds (to initial values) Set bounds to constrain the amount lookup table values can change relative to their initial values.
This image shows an example of the resulting surface plot when relative bounds are specified.
Percentage (of initial values) Select to apply relative bounds as a percentage of the initial lookup table values.
Clear existing masks
Select to clear the table mask for all selected lookup tables. Model-Based Calibration Toolbox™ adds filled table cells to the table mask and uses the entire mask for extrapolation.
Note
In previous software versions, the Clear existing masks option applied on a per-table basis.
Extrapolate
Select to extrapolate across the entire table for all selected lookup tables after filling cells. The extrapolation is based on the filled cells in the mask and any locked cells.
Note
In previous software versions, the Extrapolate option applied on a per-table basis.
Set up the feature fill.
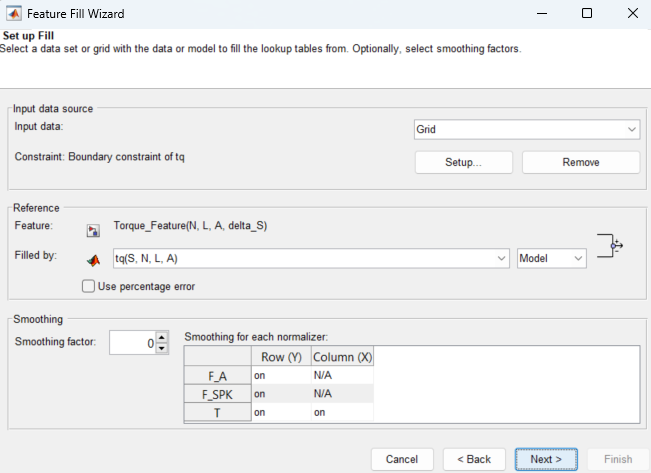
Parameter Description Reference
Specify the model or data set column to use to fill the feature.
By default, the feature fill uses the absolute error. To use the percentage error, select Use percentage error.
Input data source
For Input data, specify either
GridorData Set. The data set option is available only if there is a data set containing some of the inputs to the feature.For Constraint, you can click Setup to create a constraint. Constraints restrict the input grid or data set values that CAGE uses to fill the feature. By default, the toolbox sets the constraint to the boundary model associated with the main model.
Smoothing
Specify a Smoothing factor on table axes.
If you are filling the feature with a data set, specify a smoothing factor.
The smoothing factor applies to all the tables CAGE fill.
The smoothing factor applies a smoothing penalty to the optimization. The smoothness penalty uses the second derivative to avoid steep jumps between adjacent table values.
Connect the model and feature inputs to define the feature fill.
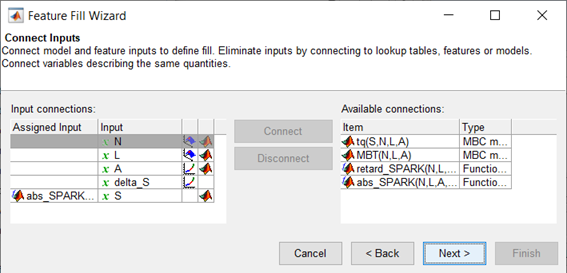
Click Next.
Set the grid values that you want to use for the feature fill.
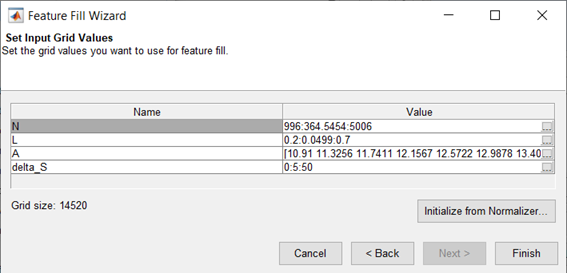
Optionally, you can click Initialize from Normalizer to use the normalizer breakpoints as a variable value. In the Select Normalizer dialog box, you can also choose to interleave values between breakpoints. Interleaving values can minimize interpolation error by adding values between each normalizer value. In this way, you can create a grid of more points than table cells to optimize over. Select normalizers in the dialog box to use those breakpoints as the value.
Click Finish to fill the tables.
CAGE evaluates the model over the number of grid points specified, then calculates the total square error between this mesh model and the feature values. If no gradient constraints exist, CAGE uses
lsqnonlinto adjust the table values until the error is minimized. If there are gradient constraints, to specify the gradient of the table at each cell, CAGE usesfmincon.
Saving and Reusing Feature Fill Settings
After feature filling, the Feature Fill Wizard saves your settings. You can run and manage your saved fill settings from the Feature Fill Settings pane. If you import new models, CAGE reuses the saved settings for the feature fill.
| To | Select |
|---|---|
Define new fill settings starting from the defaults | Select Feature > New Fill Setting. |
Rerun all saved fill settings in your feature | Select Feature > Run All Fill Settings. |
Copy and modify some saved settings | Select Feature > Duplicate Selected Fill Setting. |
Delete all saved fill settings for the selected feature | Select Feature > Clear All Fill Settings. |

