Getting Started with VEX Microcontroller Support Package
This example shows you how to use Simulink® Coder™ Support Package for ARM® Cortex®-based VEX® Microcontroller to run a Simulink model on a VEX microcontroller.
Introduction
Simulink Coder Support Package for ARM Cortex-based VEX Microcontroller enables you to create and run Simulink models on a VEX microcontroller. The support package includes a library of Simulink blocks for configuring and accessing VEX peripherals and student-competition specific convenience blocks.
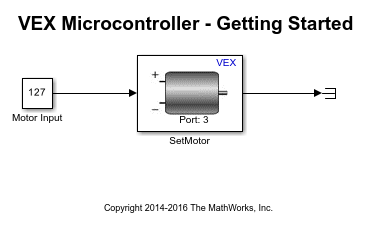
In this example, you will learn how to configure a simple Simulink model to generate code for VEX microcontroller and run the generated code on the board. This model will set a DC motor connected to pin 3 on the VEX microcontroller to rotate at maximum speed.
Prerequisites
If you are new to Simulink, we recommend watching the Simulink Quick Start video.
Install and run the VEXnet Firmware Upgrade Utility. It overwrites the Master Code on the ARM Cortex-based VEX Microcontroller or a VEXnet Joystick to the latest version. The downloaded ZIP file includes the Upgrade Utility and instructions in PDF. Read the instructions on how to use the Upgrade Utility. The Upgrade Utility will overwrite any User Code in the Cortex Microcontroller with Default Code. Be sure to back up any custom User Code before updating. NOTE: This utility is supported only on Windows® OS.
If you are using VEXnet Key 2.0 USB keys, install and run the VEXnet Key 2.0 Firmware Upgrade Utility to update the firmware. The VEXnet Key 2.0 supports its own internal firmware updates to ensure continued system improvements. NOTE: This utility is supported only on Windows OS.
Required Hardware
To run this example you will need the following hardware:
ARM Cortex-based VEX Microcontroller
Standard DC Motor and Motor Controller 29
7.2V Battery
USB type A-Male to A-Male cable
Task 1 - Review the Block Library for the ARM Cortex-based VEX Microcontroller Support Package
1. Enter simulink at the MATLAB® prompt. This opens the Simulink Start Page. Create a new Simulink model.
2. In the Simulink model, from the Simulation tab, navigate to Library Browser > *Simulink Coder Support Package for ARM Cortex-based VEX Microcontroller.
3. Double-click the DC Motor block in Actuators subsystem within the VEX Microcontroller library. Review the block mask, which contains a description of the block and the Motor Channel as an input parameter.
Task 2 - Create a Model for VEX Microcontroller
In this task, you will create a simple Simulink model that sets a DC motor connected to pin 3 on the VEX microcontroller to rotate at maximum speed (the DC motor block accepts speeds between -127 and 127).
1. In MATLAB, select HOME > New > Simulink Model.
2. Drag the Constant block from the Utilities subsystem within the VEX Microcontroller library to your model. Set the value of the Constant block to 127.
3. Drag the Terminator block from the Utilities subsystem within the VEX Microcontroller library to your model.
4. Drag the DC Motor block from the Actuators subsystem within the VEX Microcontroller library to your model. Rename it to SetMotor. Set the value of the Motor Channel to 3. Motor Channel is the pin to which the DC motor is connected.
5. Connect the Constant block to the input of the SetMotor block.
6. Connect the output of the SetMotor block to a Terminator block.
A preconfigured vexarmcortex_gettingstarted is also available.

Task 3 - Set Ip the VEX Microcontroller and DC Motor
In this task, you will connect the VEX Microcontroller to host computer and a DC motor to the appropriate pin on the microcontroller.
1. Connect the VEX Microcontroller to your computer with a USB A-Male to A-Male cable.
On Windows, it will appear as a COM device with the label of VEX Robotics Comm Port (COM#) in the Device Manager.

On Mac, it will appear as a USB device when you run the ls command at the terminal window as shown in the image below.

2. Connect a DC motor to Motor Channel 3 on the VEX microcontroller. Use the Motor Controller 29 cables to establish the connection between the motors leads and the pin on VEX Microcontroller. Connect them as described on Page 4 of the VEX Microcontroller and VEXnet Joystick User Guide.
Task 4 - Configure and Run the Model on VEX Microcontroller
1. In your Simulink model, go to the Modeling tab and click Model Settings.

2. When the Configuration Parameters page opens up, navigate to the Hardware Implementation pane.
Set the Hardware board to ARM Cortex-based VEX Microcontroller.
In the Target Hardware Resources section set the Build options to Build, load and run to automatically download the generated binary file on to the connected VEX microcontroller.
3. Select Solver on the tree located on the left-hand side of the Configuration Parameters dialog window in order to navigate to the Solver pane.
Set the Solver to discrete (no continuous states).
4. Click OK.
5. In your Simulink model, go to the Hardware tab and click Build, Deploy and Start. The model should automatically be deployed to the VEX microcontroller.
If there was a problem deploying the model to the VEX microcontroller, a warning will be displayed in a Diagnostic Viewer that is automatically pulled up. Possible causes for failure to successfully download are:
The VEX microcontroller needs to be rebooted.
The COM Port is busy because of another software (eg. the VEXNet Firmware Update utility) is already connected to the VEX microcontroller.
The Build Action in the Configuration Parameters>Hardware Implementation>Build Options drop down is set to Build and not Build, load, and run.

6. Turn on the VEX microcontroller and observe that the DC motor rotates connected to pin # 3 rotates continuously.
7. Save your model.
A pre-configured model(vexarmcortex_gettingstarted) is included for your convenience.
Other Things to Try with DC Motor Block
For example:
Create and run a model that rotates the motor to a specific speed.
Create and run a model that rotates the motor in the opposite direction.