Video Mosaicking Using Raspberry Pi Pan Tilt HAT
This example shows how to use the Pan Tilt HAT block from Simulink® Support Package for Raspberry Pi® Hardware to create a mosaic from a video sequence. Video mosaicking is the process of stitching video frames together to form a comprehensive view of a scene. The resulting mosaic image is a compact representation of the video data. This technique is often used in video compression and surveillance applications.
Prerequisites
To save an image sequence from a video on the SD card of a Raspberry Pi, use the MathWorks® Raspbian image for Deep Learning to leverage the OpenCV library installed within the Raspbian image. Otherwise, you can use the customized Raspbian Linux® image.
For more information on how to use Simulink Support Package for Raspberry Pi Hardware, see Get Started with Simulink Support Package for Raspberry Pi Hardware.
Required Hardware
Raspberry Pi board
Power supply with at least 1A output
Pan Tilt HAT hardware module
Camera board
Hardware Setup
Mount the Pan Tilt HAT hardware module on your Raspberry Pi board.
Mount the camera board to your pan and tilt hardware module.
Connect the CSI cable of the camera board to the CSI port on the Raspberry Pi. For more information, refer to Camera Module.
Configure and calibrate the pan and tilt hardware module. For more information, see Configure and Calibrate Pan Tilt Hardware Using Raspberry Pi Pan Tilt HAT.
Configure Simulink Model and Calibrate Parameters
Open the raspberrypi_video_mosaicking Simulink model.

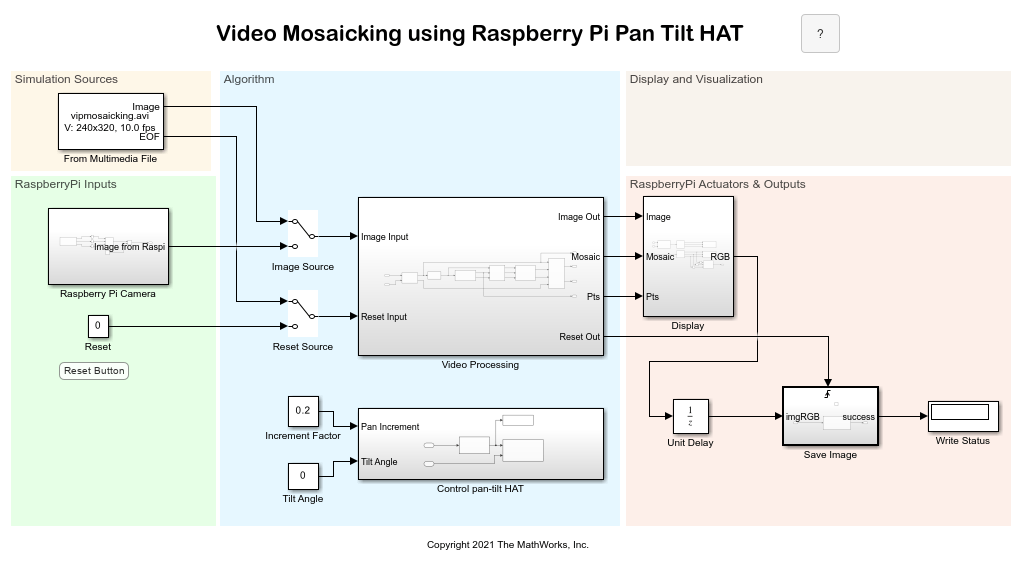
Simulation Sources
Specify the name of the multimedia file containing the video data in the From Multimedia File block. You can specify the file name by either clicking Browse and navigating to the file or by specifying the full file path in the File name parameter. The block outputs video frames and an end-of-file indicator for each video frame. The block outputs a single RGB multidimensional signal.
Raspberry Pi Inputs
Use the V4L2 Video Capture block from the Raspberry Pi Camera subsystem to capture live video using a camera board connected to the Raspberry Pi hardware. Press the Reset push button block to stop the mosaic stitching process and save the image mosaic.

Algorithm
The input video sequence to the Video Processing subsystem can either be a multimedia file or a video captured using a camera connected to the Raspberry Pi.

The Video Processing subsystem first downsamples the input video sequence by processing every fifth frame. The Corner Detection block finds points matched between successive frames by the Corner Matching subsystem. The Corner Matching Subsystem finds the number of corners, location, and their metric values. The subsystem then calculates the distances between all features in the current frame with those in the previous frame. By searching for minimum distances, the subsystem finds the best matching features. Then, the Estimate Geometric Transformation block computes an accurate estimate of the transformation matrix. This block uses the random sample consensus (RANSAC) algorithm to eliminate outlier input points, reducing error along the seams of the output mosaic image. By accumulating transformation matrices between consecutive video frames, the subsystem calculates the transformation matrix between the current and the first video frame. The subsystem then overlays the current video frame on to the output image. By repeating this process, the subsystem generates a mosaic image. Finally, the Mosaicking subsystem overlays the current video frame onto the output image to generate a mosaic. For more information on the geometric transformation matrix, see Matrix Representation of Geometric Transformations (Image Processing Toolbox) and affine2d (Image Processing Toolbox).
The algorithm resets the Video Processing subsystem when you rewind the video sequence or when the Estimate Geometric Transformation (Computer Vision Toolbox) block does not find enough inliers. To pan the camera to a greater length, use the Size of the mosaic image parameter in the Mosaicking mask to change the size of the frame for the stitched image. You can change the placement of the image inside the frame of the stitched image frame by changing the position parameters in the Initial image placement parameter.
Note: Change the parameters in the Mosaicking subsystem according to the resolution of your camera board.
To open the Mosaicking subsystem, click the Look inside mask arrow. If the number features identified by the algorithm in a video sequence is less than the value you configured in the Number of Inliers Threshold block, the algorithm resets the Mosaicking subsystem and saves the stitched images. The Warp (Computer Vision Toolbox) block in the Mosaicking subsystem applies projective or affine transformation to an image.
Use the Control Pan Tilt Hat subsystem in the Algorithm area to set the pan angle and the tilt angle. The pan and tilt hardware module rotates the camera board from –90 to +90 degrees. To smoothly pan or tilt your camera board, set the value in the Increment Factor and Tilt Angle blocks to as low a value as possible. For more information on how to set these values, see Pan Tilt Hat.

Raspberry Pi Actuators & Outputs
The Display subsystem contains two SDL Video Display blocks each displaying these windows:
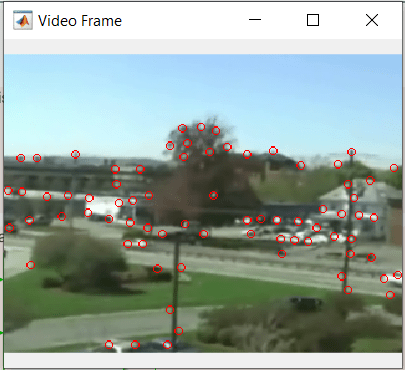
Video Frame window — Displays corner locations in the current window frame.
Stitched window — Displays the mosaic image.

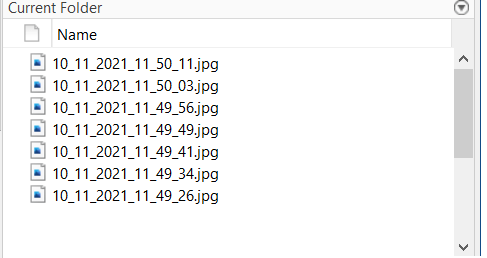
In the simulation and the connected IO mode of operation, the MATLAB Function block in the Save Image subsystem saves the stitched mosaic images to the host computer, while in the deployment mode of operation, it saves the images on the SD card of the Raspberry Pi board. Every time the block saves the stitched mosaic image, the Write Status Display block display 1. The MATLAB Function block saves stitched images in the dd_mm_yyyy_hr_min_sec.jpg format.
You can run this example in either the simulation or the connected IO mode, or you can deploy the Simulink model on your Raspberry Pi hardware.
Run Simulink Model in Simulation Mode
In the simulation mode, the From Multimedia File block reads the video frames and audio samples from the multimedia file. Ensure that the positions of the Image Source and Reset Source switches in the Algorithm area point towards the Image and EOF output of the From Multimedia File block. In the Simulation tab of the Simulink model, in the Simulate section, click Run. Observe two SDL Video Display windows on the screen. One SDL Video Display block displays the actual video frame, while the other SDL Video Display block displays the stitched image output.
The Video Frame window shows the corner locations in the current video frame.

The Stitched window shows the resulting mosaic image.

In the simulation mode, every time the video in the From Multimedia File block reaches the last frame, the algorithm triggers the reset button and stores the stitched image to the host computer. You can view the stitched images in the Current Folder pane in MATLAB®.

Run Simulink Model in Connected IO and External Mode
In the connected IO or external mode, the V4L2 Video Capture block in the Raspberry Pi Inputs area captures the live multimedia file. Ensure that the positions of the Image Source and Reset Source switches in the Algorithm area point towards the Raspberry Pi Camera subsystem and Reset push button, respectively. Set up your hardware as described in the Hardware Setup section and connect your Raspberry Pi to the host computer.
To run the Simulink model in connected IO mode, on the Hardware tab of the Simulink model, in the Mode section, select Run on board and then select Connected IO from the drop-down list. In the Run on Computer section, click Run with IO.
To run the Simulink model in external mode, on the Hardware tab of the Simulink model, in the Mode section, click Run on board and then select Run on board from the drop-down list. In the Run on Hardware section, click Monitor & Tune.
Note: For the external mode simulation, ensure to delete the From Multimedia File in the Simulation Sources area. Make a direct connection to the Image Source and Reset Source in the Algorithm area with the Image from Raspi and Reset outputs in the RaspberryPi Inputs area, respectively.
You can control the pan and tilt angles of the camera from the Control Pan Tilt HAT subsystem in the Algorithm area. Observe two SDL Video Display windows on the screen. One SDL Video Display block displays the actual video frame, while the other SDL Video Display block displays the stitched image output. Every time you press the Reset pushbutton from the Raspberry Pi Inputs area, a mosaicked image is stored to the host computer.
Deploy Simulink Model on Raspberry Pi Hardware
To deploy the Simulink model on your Raspberry Pi board, the V4L2 Video Capture block in the Raspberry Pi Inputs area captures the live multimedia file. Delete the From Multimedia File in the Simulation Sources area. Make a direct connection to the Image Source and Reset Source in the Algorithm area with the Image from Raspi and Reset outputs in the RaspberryPi Inputs area, respectively. Set up your hardware as described in the Hardware Setup section and connect your Raspberry Pi to the host computer. On the Hardware tab of the Simulink model, in the Mode section, click Run on board and then select Run on board from the drop-down list. In the Deploy section, click Build, Deploy & Start. Observe two display windows on the screen. One display window displays the actual video frame, while the other display window displays the stitched image output. Use the getFile function to copy the stitched image from the SD card of the Raspberry Pi to your host computer.
Other Things to Try
Change the pan angle value in the Incremental Factor Constant block to obtain a smooth camera movement.
Change the transformation type from Affine to Projective or Nonreflective Similarity in the Estimate Geometric Transformation block and observe the mosaic output.
Change the interpolation method in the Image Wrap block and observe the mosaic output.
Change the number of Inliers Threshold and observe the mosaic output.
See Also
affine2d(Image Processing Toolbox)Matrix Representation of Geometric Transformations (Image Processing Toolbox)
Video Mosaicking (Computer Vision Toolbox)
Configure and Calibrate Pan Tilt Hardware Using Raspberry Pi Pan Tilt HAT