Flight Instrument Components in App Designer
Create aerospace-specific applications in App Designer using common aircraft flight instruments. App Designer is a rich development environment that provides layout and code views, a fully integrated version of the MATLAB® editor, and a large set of interactive components. For more information on App Designer, see Develop Apps Using App Designer. To use the flight instrument components in App Designer, you must have an Aerospace Toolbox license.
For a simple flight instruments app example that uses the App Designer, see the Getting Started examples when you first start App Designer. To create an app to visualize saved flight data for a Piper PA-24 Comanche, use this workflow.
Start App Designer by typing
appdesignerat the command line, and then select Blank App on the Getting Started page.Drag aerospace components from the Component Library to the app canvas.
To load simulation data, add a
startupfunction to the app, and then create an animation object.Enter the callbacks, functions, and properties for the components to the app. Also add associated code.
Trigger a display of the animation in the instrument app.
Save and run the app.
The following topics contain more detailed steps for this workflow as an example. This
example uses an Aero.Animation object.
Start App Designer and Create a New App
Start App Designer. In the MATLAB Command Window, type:
appdesigner
In the App Designer welcome window, click Blank App. App Designer displays with a blank canvas.
To look at the blank app template, click Code View. Notice that the app contains a template with sections for app component properties, component initialization, and app creation and deletion.
To return to the canvas view, click Design View.
Drag Aerospace Components into the App
To drag components to the blank canvas:
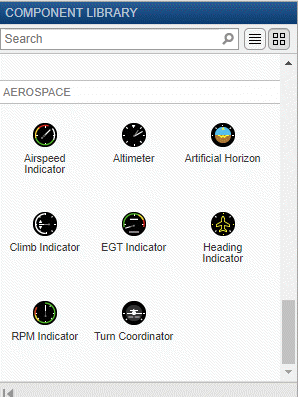
In the Component Library, navigate to Aerospace.

From the library, drag these aerospace components to the canvas:
Airspeed Indicator
Artificial Horizon
Turn Coordinator
Heading Indicator
Climb Indicator
Altimeter
This example uses an
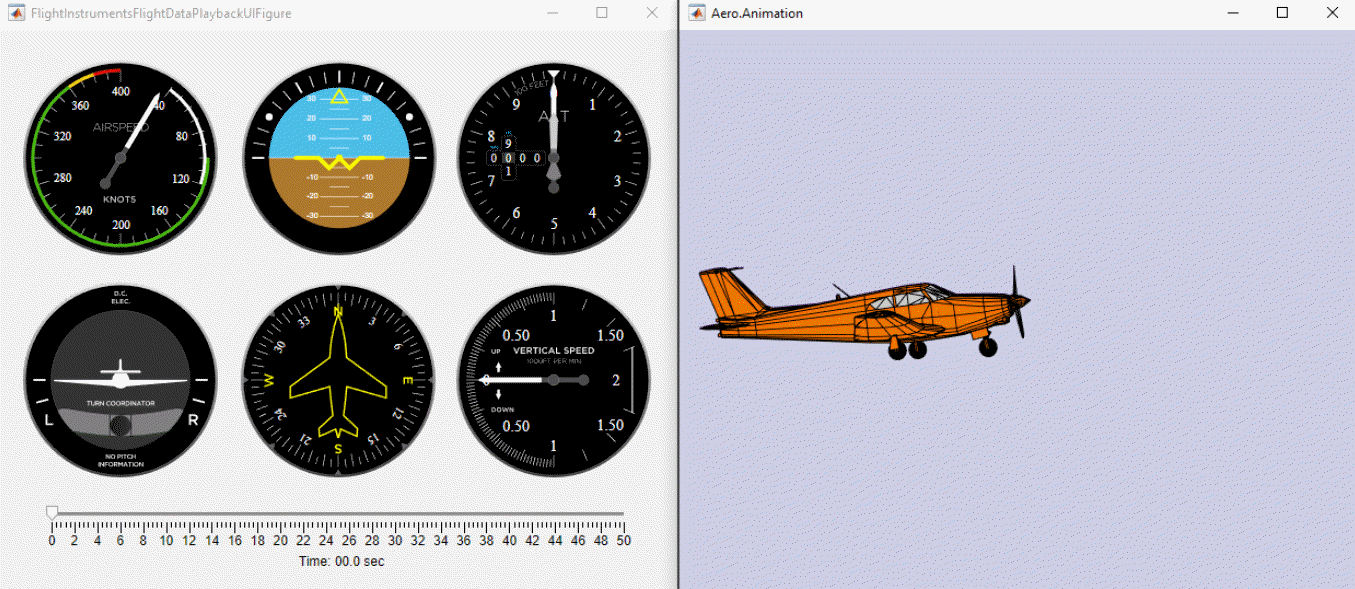
Aero.Animationobject to visualize the flight status of an aircraft over time. To set the current time, add a time input device such as a slider or knob. As you change the time on the time input device, the flight instrument components and the animation window update to show the results. The example code provides further details.For this example:
Add a Slider component as a time input device.
To display the current time from the slider, edit the label of the slider. For example:
Change the label to
Time: 00.0 sec.Change the upper limit to
50.
Click Code View and note that the properties and component initialization sections now contain definitions for the new components. The code managed by App Designer is noneditable (grayed out).
In the Property Inspector pane on the right of the canvas, double-click and rename these components:
UIfigure component to
FlightInstrumentsFlightDataPlaybackUIFigureSlider component to
Time000secSlider
Add Code to Load and Visualize Data for the App
In the code view for the app, place the cursor after the properties section and, in the Insert section, click Callback.
The Add Callback Function dialog box displays.
In the Add Callback Function dialog box:
From the Callback list, select
StartupFcn.In the Name parameter, enter a name for the startup function, for example
startupFcn.A callbacks section is added.
Add additional properties to the class for the simulation data and the animation object. Place your cursor just after the component properties section and, in the Insert section, click Property > Public Property. In the new properties template, copy code so that it looks like this:
simdata % Saved flight data [time X Y Z phi theta psi]
animObj % Aero.Animation object
simdatais the saved flight data.animObjis theAero.Animationobject for the figure window.To the
startupFcnsection, below the previously added section, add code to thestartupfunction that loads simulation data. Thesimdata.matfile contains logged simulated flight trajectory data.% Code that executes after component creation function startupFcn(app) % Load saved flight status data savedData = load("simdata.mat"); yaw = savedData.simdata(:,7); yaw(yaw<0) = yaw(yaw<0)+2*pi; % Unwrap yaw angles savedData.simdata(:,7) = yaw; app.simdata = savedData.simdata; % Load saved flight status data
To visualize animation data, create an animation object. After loading the simulation data:
Create an
Aero.Animationobject.app.animObj = Aero.Animation;
Use the piper pa-24 comanche geometry for the animation object.
app.animObj.createBody('pa24-250_orange.ac','Ac3d'); % Piper PA-24 Comanche geometryUse the data loaded previously,
app.simdata, as the source for the animation object.app.animObj.Bodies{1}.TimeSeriesSourceType = 'Array6DoF'; % [time X Y Z phi theta psi] app.animObj.Bodies{1}.TimeSeriesSource = app.simdata;Initialize the camera and figure positions.
app.animObj.Camera.PositionFcn = @staticCameraPosition;
app.animObj.Figure.Position = [app.FlightInstrumentsFlightDataPlaybackUIFigure.Position(1)+625,...
    app.FlightInstrumentsFlightDataPlaybackUIFigure.Position(2),...
    app.FlightInstrumentsFlightDataPlaybackUIFigure.Position(3),...
    app.FlightInstrumentsFlightDataPlaybackUIFigure.Position(4)];
app.animObj.updateBodies(app.simdata(1,1)); % Initialize animation window at t=0
app.animObj.updateCamera(app.simdata(1,1));
Create and show the figure graphics object.
app.animObj.show();
Add Code to Trigger a Display of the Animation Object
To trigger an update of the animation object and flight instruments:
In the code view for the app, add a callback for the slider. Navigate to the Property Inspector section and select
app.Time000secSlider.Click on the Callbacks tab and enter a name for ValueChangingFcn,
Time000secSliderValueChanging, and press Enter.In the code view, App Designer adds a callback function
Time000secSliderValueChanging.Add code to display the current time in the slider label
Time000secSliderLabel:% Display current time in slider component t = event.Value; app.Time000secSliderLabel.Text = sprintf('Time: %.1f sec', t);Under the previously added code, add code to compute data values for each flight instrument component corresponding with the selected time on the slider:
% Find corresponding time data entry
k = find(app.simdata(:,1)<=t);
k = k(end);

       app.Altimeter.Altitude = convlength(-app.simdata(k,4), 'm', 'ft');
       app.HeadingIndicator.Heading = convang(app.simdata(k,7),'rad','deg');
       app.ArtificialHorizon.Roll = convang(app.simdata(k,5),'rad','deg');
       app.ArtificialHorizon.Pitch = convang(app.simdata(k,6),'rad','deg');

       if k>1
           % Estimate velocity and angular rates
           Vel = (app.simdata(k,2:4)-app.simdata(k-1,2:4))/(app.simdata(k,1)-app.simdata(k-1,1));
           rates = (app.simdata(k,5:7)-app.simdata(k-1,5:7))/(app.simdata(k,1)-app.simdata(k-1,1));

           app.AirspeedIndicator.Airspeed = convvel(sqrt(sum(Vel.^2)),'m/s','kts');
           app.ClimbIndicator.ClimbRate = convvel(-Vel(3),'m/s','ft/min');

           % Estimate turn rate and slip behavior
           app.TurnCoordinator.Turn = convangvel(rates(1)*sind(30) + rates(3)*cosd(30),'rad/s','deg/s');
           app.TurnCoordinator.Slip = 1/(2*pi)*convang(atan(rates(3)*sqrt(sum(Vel.^2))/9.81)-app.simdata(k,5),'rad','deg');
       else
           % time = 0
           app.ClimbIndicator.ClimbRate = 0;
           app.AirspeedIndicator.Airspeed = 0;
           app.TurnCoordinator.Slip = 0;
           app.TurnCoordinator.Turn = 0;
       end
Under the previously added code, add code to update the animation window display,:
%% Update animation window display
app.animObj.updateBodies(app.simdata(k,1));
app.animObj.updateCamera(app.simdata(k,1));
Add Code to Close the Animation Window with UIfigure Window
Add a
CloseRequestFcnfunction. In the code view for the app, place the cursor after the properties section forFlightInstrumentsFlightDataPlaybackUIFigureand, in the Insert section, click Callback.The Add Callback Function dialog box displays.
In the Add Callback Function dialog box:
From the Callback list, select
CloseRequestFcn.In the Name parameter, enter a name for the close function, for example
FlightInstrumentsFlightDataPlaybackUIFigureCloseRequest.A callbacks section is added.
In the new callback template, add code to delete the animation object, such as:
% Close animation figure with app
delete(app.animObj);
delete(app);
Save and Run the App
To save and run the app:
Save the app with the file name
myFlightInstrumentsExample. Note that this name is applied to theclassdef.Click Run.
After saving your changes, you can run the app from the App Designer window, or by typing its name (without the
.mlappextension) at the MATLAB Command Window. When you run the app from the command prompt, the file must be in the current folder or on the MATLAB path.
To visualize the saved flight data, change the slider position. Observe the flight instruments as the aircraft changes orientation in the animation window.
For a complete example, see Aerospace Flight Instruments in App Designer.
See Also
Functions
uiaeroairspeed|uiaeroaltimeter|uiaeroclimb|uiaeroegt|uiaeroheading|uiaerohorizon|uiaerorpm|uiaeroturn|uifigure|uiaxes|uislider|uilabel
Properties
- AirspeedIndicator Properties | Altimeter Properties | ArtificialHorizon Properties | ClimbIndicator Properties | EGTIndicator Properties | HeadingIndicator Properties | RPMIndicator Properties | TurnCoordinator Properties