Verify Generated Code on NVIDIA Targets Using PIL in Simulink
R2026bThis example shows how to verify code generated from Simulink® using processor-in-the-loop (PIL) execution on NVIDIA® targets with the MATLAB® Coder™ Support Package for NVIDIA® Jetson™ and NVIDIA DRIVE™ Platforms.
The PIL verification process tests that the behavior of the deployment code matches the design. In a PIL simulation, Simulink runs the generated code on the NVIDIA Jetson board and captures the results to verify the numerical equivalence of the simulation on the host computer and the code generation results.
This example shows how to verify the results of the generated code by using PIL execution for a referenced model and a top model.
Prerequisites
Target Board Requirements
NVIDIA Jetson embedded platform.
Ethernet crossover cable to connect the target board and host PC. If you can connect the board to a local network, a cable is not required.
NVIDIA CUDA® toolkit installed on the board.
Environment variables on the target for the compilers and libraries. For more information, see Prerequisites for Generating Code for NVIDIA Boards.
Development Host Requirements
Simulink Coder™ for C/C++ code generation.
Connect to NVIDIA Jetson
The MATLAB Coder Support Package for NVIDIA Jetson and NVIDIA DRIVE Platforms uses an SSH connection over TCP/IP to build and run the generated code on Jetson or DRIVE platforms. Connect the target platform to the same network as the host computer or use an Ethernet crossover cable to connect the board directly to the host computer. For information on how to set up and configure your board, see the NVIDIA documentation.
To communicate with the NVIDIA Jetson hardware, create a live hardware connection object by using the jetson function.
hwobj = jetson("jetson-deviceaddress","username","password");
When connecting to the target board for the first time, you must provide the hostname or IP address, username, and password of the target board. On subsequent connections, you do not need to supply the address, username, and password. The Jetson hardware connection object reuses these settings from the most recent successful connection to an NVIDIA board.
hwobj = jetson;
### Checking for CUDA availability on the target...
### Checking for 'nvcc' in the target system path...
### Checking for cuDNN library availability on the target...
### Checking for TensorRT library availability on the target...
### Checking for prerequisite libraries is complete.
### Gathering hardware details...
### Checking for third-party library availability on the target...
### Checking for available I2C buses...
### Gathering hardware details is complete.
Board name              : NVIDIA Jetson AGX Thor Developer Kit
CUDA Version            : 13.0
cuDNN Version           : 9.1
TensorRT Version        : 10.13.3
GStreamer Version       : 1.24.2
V4L2 Version            : 1.26.1
SDL Version             : 1.2
OpenCV Version          : 4.8.0
Available Webcams       :
Available GPUs          : NVIDIA Thor
Available Digital Pins  :
Verify the Generated Code by Using a Model Reference PIL Simulation
To verify generated code for a referenced model, run a PIL simulation by using a Model block. You can use this approach to verify the code for a model without modifying the top model.
In this example, you verify the code for the model CountPeaks. The CountPeaks model contains a MATLAB Function block that counts the number of peaks in an input signal and outputs the result.
open_system("CountPeaks");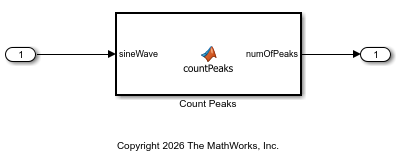
To configure the model to run on NVIDIA Jetson, open the Configuration Parameters dialog box and, in the Hardware Implementation section, set the Hardware board parameter to NVIDIA Jetson. Alternatively, enter this code in the MATLAB Command Window:
set_param("CountPeaks",HardwareBoard="NVIDIA Jetson");
Open the UsingPilBlock model. The UsingPilBlock model contains a Sine Wave block that passes a sine wave to two Model blocks that both reference the CountPeaks model. To compare the results of normal mode simulation against PIL simulation, you use the Count Peaks block to simulate the model in normal mode and the Count Peaks(PIL) block to simulate the model in PIL mode.
open_system("UsingPilBlock");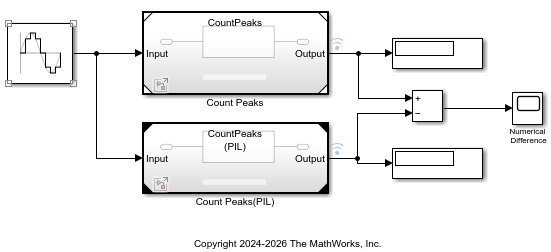
To capture the results from the normal simulation mode and PIL simulation mode, configure the model to log output data.
set_param("UsingPilBlock",SignalLogging="on");
set_param("UsingPilBlock",SignalLoggingName="logsout");
Set the simulation mode of the Count Peaks(PIL) Model block. Right-click the Count Peaks(PIL) block, select Block Parameters, and set the Simulation mode parameter to Processor-in-the-loop (PIL). Alternatively, enter this code in the MATLAB Command Window:
set_param("UsingPilBlock/Count Peaks(PIL)",SimulationMode="Processor-in-the-loop (PIL)");
Run the simulation. Simulink generates code for the CountPeaks model, deploys the code to the NVIDIA Jetson board, and runs both the normal and PIL simulations simultaneously.
out = sim("UsingPilBlock",10);### Searching for referenced models in model 'UsingPilBlock'. ### Total of 1 models to build. ### Starting serial code generation build. ### Starting model reference code generation target build for: CountPeaks ### Build reason: "CountPeaks.c" did not exist. ### Generating code and artifacts to 'Model specific' folder structure ### Generating code into build folder: C:\ExampleManager30cc10\user.May13\nvidia-ex89386547\slprj\ert\CountPeaks ### Invoking Target Language Compiler on CountPeaks.rtw ### Using System Target File: N:\53\user.Bgcoder.May11\matlab\rtw\c\ert\ert.tlc ### Loading TLC function libraries ........ ### Generating TLC interface API for custom data ### Initial pass through model to cache user defined code . ### Caching model source code ..................................... ### Writing header file CountPeaks_types.h ### Writing header file CountPeaks_private.h ### Writing header file CountPeaks.h ### Writing header file rtwtypes.h ### Writing source file CountPeaks.c . ### TLC code generation complete (took 20.819s). ### Saving binary information cache. ### Using toolchain: GNU GCC for NVIDIA Embedded Processors ### Creating 'C:\ExampleManager30cc10\user.May13\nvidia-ex89386547\slprj\ert\CountPeaks\CountPeaks.mk' ... ### Building 'CountPeaks_rtwlib': make -f CountPeaks.mk -j4 all ### Successful completion of build procedure for: CountPeaks Build Summary Model reference code generation targets: Model Build Reason Status Build Duration ============================================================================================== CountPeaks Target (CountPeaks.c) did not exist. Code generated and compiled. 0h 1m 27.376s 1 of 1 models built (0 models already up to date) Build duration: 0h 1m 32.512s ### Connectivity configuration for component "CountPeaks": NVIDIA Jetson ### PIL execution is using Port 17725. PIL execution is using 30 seconds for receive timeout. ### Preparing to start PIL simulation ... Building with 'Microsoft Visual C++ 2022 (C)'. MEX completed successfully. ### Using toolchain: GNU GCC for NVIDIA Embedded Processors ### Creating 'C:\ExampleManager30cc10\user.May13\nvidia-ex89386547\slprj\ert\CountPeaks\coderassumptions\lib\CountPeaks_ca.mk' ... ### Building 'CountPeaks_ca': make -f CountPeaks_ca.mk -j4 all ### Using toolchain: GNU GCC for NVIDIA Embedded Processors ### Creating 'C:\ExampleManager30cc10\user.May13\nvidia-ex89386547\slprj\ert\CountPeaks\pil\CountPeaks.mk' ... ### Building 'CountPeaks': make -f CountPeaks.mk -j4 all ### Starting application: 'slprj\ert\CountPeaks\pil\CountPeaks.elf' ### Launching application CountPeaks.elf... PIL execution terminated on target.
Plot and compare the results of the normal and PIL simulations. The results match.
simulationOutput = out.logsout{1}.Values.Data;
pilOutput = out.logsout{2}.Values.Data;

fig1 = figure;
subplot(3,1,1), plot(simulationOutput), title("Normal Simulation")
subplot(3,1,2), plot(pilOutput), title("PIL Simulation")
subplot(3,1,3), plot(simulationOutput-pilOutput), ...
    title("Difference Between Normal and PIL Simulations")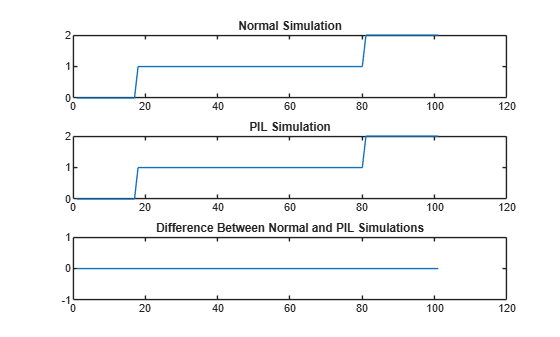
Close the models.
close_system("UsingPilBlock",0);
close_system("CountPeaks",0);
Verify the Generated Code by Using Top-Model PIL Simulation
Alternatively, verify the generated code for the top model by running a PIL simulation. Use this approach to test code generated for the top model or when you want to switch the model between normal and PIL simulation modes.
Open the TopModelPil model. This model contains one Inport block that loads the input signal from MATLAB workspace. The model passes the input signal to a MATLAB function block that counts the number of peaks in the incoming signal. The model logs the number of peaks in the input signal to the MATLAB workspace using the Outport block.
open_system("TopModelPil");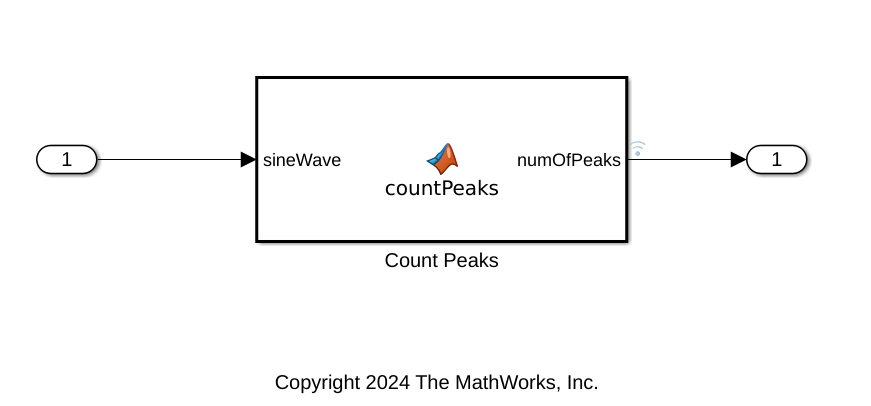
Use the set_param function to set the HardwareBoard parameter to NVIDIA Jetson.
set_param("TopModelPil",HardwareBoard="NVIDIA Jetson");
Generate the input stimulus data by using the model stop time and the step size.
StopTime = 10;
StepSize = 0.2;
Input.time = (0:StepSize:StopTime)';
Input.signals.values = sin(Input.time);
Input.signals.dimensions = 1;
Configure the logging options for the model.
set_param("TopModelPil",LoadExternalInput="on");
set_param("TopModelPil",ExternalInput="Input");
set_param("TopModelPil",SignalLogging="on");
set_param("TopModelPil",SignalLoggingName="logsout");
set_param("TopModelPil",SaveOutput="on");
set_param("TopModelPil",OutputSaveName="yout");
Run a normal mode simulation and store the output.
set_param("TopModelPil",SimulationMode="normal");
simOutput = sim("TopModelPil",StopTime);
simulationOutput = simOutput.yout.signals.values;
Run a PIL simulation programmatically by using the sim command.
set_param("TopModelPil",SimulationMode="processor-in-the-loop (pil)");
simOutput = sim("TopModelPil",StopTime);
### Unable to find Simulink cache file "TopModelPil.slxc".
### Searching for referenced models in model 'TopModelPil'.
### Total of 1 models to build.
### Starting top model code generation target build for: TopModelPil
### Build reason: "TopModelPil.c" did not exist.
### Generating code and artifacts to 'Model specific' folder structure
### Generating code into build folder: C:\ExampleManager30cc10\user.May13\nvidia-ex89386547\TopModelPil_ert_rtw
### Invoking Target Language Compiler on TopModelPil.rtw
### Using System Target File: N:\53\user.Bgcoder.May11\matlab\rtw\c\ert\ert.tlc
### Loading TLC function libraries
........
### Generating TLC interface API for custom data
### Initial pass through model to cache user defined code
.
### Caching model source code
..............................
### Writing header file TopModelPil_types.h
.
### Writing header file TopModelPil_private.h
### Writing header file TopModelPil.h
### Writing header file rtwtypes.h
### Writing source file TopModelPil.c
### Writing header file rtmodel.h
.
### Writing source file ert_main.c
### TLC code generation complete (took 7.258s).
### Saving binary information cache.
### Using toolchain: GNU GCC for NVIDIA Embedded Processors
### Creating 'C:\ExampleManager30cc10\user.May13\nvidia-ex89386547\TopModelPil_ert_rtw\instrumented\TopModelPil.mk' ...
### Building 'TopModelPil': make  -f TopModelPil.mk -j4 buildobj
### Successful completion of build procedure for: TopModelPil
### Simulink cache artifacts for 'TopModelPil' were created in 'C:\ExampleManager30cc10\user.May13\nvidia-ex89386547\TopModelPil.slxc'.

Build Summary

Top model targets:

Model        Build Reason                           Status                        Build Duration
================================================================================================
TopModelPil  Target (TopModelPil.c) did not exist.  Code generated and compiled.  0h 0m 26.438s

1 of 1 models built (0 models already up to date)
Build duration: 0h 0m 28.405s
### Connectivity configuration for component "TopModelPil": NVIDIA Jetson ###
PIL execution is using Port 17725.
PIL execution is using 30 seconds for receive timeout.
### Preparing to start PIL simulation ...
Building with 'Microsoft Visual C++ 2022 (C)'.
MEX completed successfully.
### Using toolchain: GNU GCC for NVIDIA Embedded Processors
### Creating 'C:\ExampleManager30cc10\user.May13\nvidia-ex89386547\TopModelPil_ert_rtw\coderassumptions\lib\TopModelPil_ca.mk' ...
### Building 'TopModelPil_ca': make  -f TopModelPil_ca.mk -j4 all
### Using toolchain: GNU GCC for NVIDIA Embedded Processors
### Creating 'C:\ExampleManager30cc10\user.May13\nvidia-ex89386547\TopModelPil_ert_rtw\pil\TopModelPil.mk' ...
### Building 'TopModelPil': make  -f TopModelPil.mk -j4 all
### Starting application: 'TopModelPil_ert_rtw\pil\TopModelPil.elf'
### Launching application TopModelPil.elf...
PIL execution terminated on target.
pilOutput = simOutput.yout.signals.values;
Alternatively, you can run a PIL simulation by using the SIL/PIL Manager. In the Apps tab, under Code Verification, Validation, and Test, select SIL/PIL Manager. In the SIL/PIL tab, set SIL/PIL mode to Processor-in-the-loop (PIL) and click Run Verification to start the PIL simulation.

The code generator generates, compiles, and runs the code for the model.
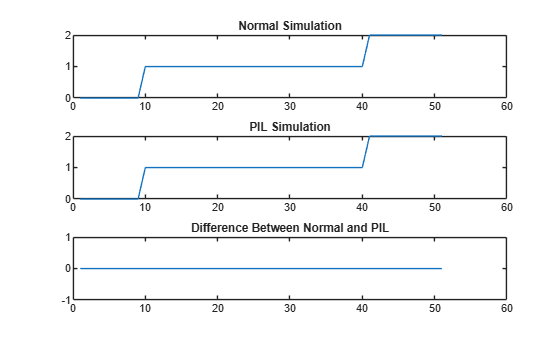
Plot and compare the results of the normal and PIL simulations. The results match.
fig = figure;
subplot(3,1,1), plot(simulationOutput), title("Normal Simulation")
subplot(3,1,2), plot(pilOutput), title("PIL Simulation")
subplot(3,1,3), plot(simulationOutput-pilOutput), ...
    title("Difference Between Normal and PIL");
Close the model.
close_system("TopModelPil",0);
