SQLite JDBC for Linux
This tutorial shows how to set up a data source and connect to an SQLite database using the Database Explorer app or the command line. The tutorial uses the SQLite JDBC 3.7.2 Driver to connect to an SQLite Version 3.7.17 database.
Step 1. Verify the driver installation.
If the JDBC driver for SQLite is not installed on your computer, find the link on the Driver Installation page to install the driver. Follow the instructions to download and install this driver on your computer.
If you do not want to install a driver and want to store relational data quickly, you can use the MATLAB® interface to SQLite. For details, see Interact with Data in SQLite Database Using MATLAB Interface to SQLite.
Step 2. Set up the data source.
You set up a data source using the Database Explorer app or the command line.
Set Up Data Source Using Database Explorer
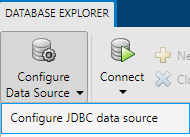
Open the Database Explorer app by clicking the Apps tab on the MATLAB Toolstrip. Then, on the right of the Apps section, click the Show more arrow to open the apps gallery. Under Database Connectivity and Reporting, click Database Explorer. Alternatively, enter
databaseExplorerat the command line.In the Data Source section, select Configure Data Source > Configure JDBC data source.
The JDBC Data Source Configuration dialog box opens.
In the Name box, enter a name for your data source. (This example uses a data source named
SQLite.) You use this name to establish a connection to your database.From the Vendor list, select
Other.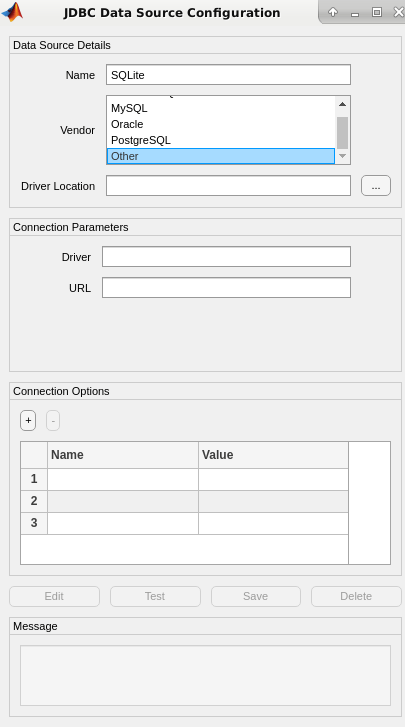
In the Driver Location box, enter the full path to the JDBC driver file.
In the Driver box, enter the SQLite driver Java® class object. Here, use
org.sqlite.JDBC.Note
Your entries for Driver and URL can vary depending on the type and version of the JDBC driver and your database. For details, see the JDBC driver documentation for your database.
Connect to the SQLite database by creating a URL string using the format
jdbc:subprotocol:subname. Thejdbcpart of this string remains constant for any JDBC driver.subprotocolis a database type, in this case,sqlite. For SQLite,subnamecontains the location of the database. For example, your URL string isjdbc:sqlite:dbpath, wheredbpathis the full path to your SQLite database on your computer. Enter your string in the URL box and press Enter.Under Connection Options, in the Name column, enter the name of an additional driver-specific option. Then, in the Value column, enter the value of the driver-specific option. Click the plus sign + to specify additional driver-specific options.
Click Test. The Test Connection dialog box opens. Enter the user name and password for your database, or leave these boxes blank if your database does not require them. Click Test.
If your connection succeeds, the Database Explorer dialog box displays a message indicating the connection is successful. Otherwise, it displays an error message.
Click Save. The JDBC Data Source Configuration dialog box displays a message indicating the data source is saved successfully. Close this dialog box.
Set Up Data Source Using Command Line
Create a JDBC data source for an SQLite database.
vendor = "Other";
opts = databaseConnectionOptions("jdbc",vendor);
Set the JDBC connection options. For example, this code assumes that you are connecting to a JDBC data source named
SQLite, full path of the SQLite driver location/home/user/Drivers/sqlite-jdbc-3.8.11.2.jar, SQLite driver Java class objectorg.sqlite.JDBC, and URL stringjdbc:sqlite:/home/user/Databases/sqlite.db.opts = setoptions(opts, ... 'DataSourceName',"SQLite", ... 'JDBCDriverLocation',"/home/user/Drivers/sqlite-jdbc-3.8.11.2.jar", ... 'Driver',"org.sqlite.JDBC", ... 'URL',"jdbc:sqlite:/home/user/Databases/sqlite.db");
Test the database connection by specifying the user name
usernameand passwordpwd, or leave these arguments blank if your database does not require them.username = "username"; password = "pwd"; status = testConnection(opts,username,password);
Save the JDBC data source.
saveAsDataSource(opts)
After you complete the data source setup, connect to the SQLite database using the Database Explorer app or the JDBC driver and command line.
Step 3. Connect using the Database Explorer app or the command line.
Connect to SQLite Using Database Explorer App
On the Database Explorer tab, in the Connections section, click Connect and select the data source for the connection.
If you stored your user credentials using the Set Credentials button, the Database Explorer app makes the connection and the Catalog and Schema dialog box opens.
If you have not stored your user credentials, the connection dialog box opens. Enter your username and password, or leave these boxes blank if your database does not require them. Click Connect and the Catalog and Schema dialog box opens.
In the connection dialog box, enter a user name and password, or leave these boxes blank if your database does not require them. Click Connect.
The app connects to the database and displays its tables in the Data Browser pane. A data source tab appears to the right of the pane. The title of the data source tab is the data source name that you defined during the setup. The data source tab contains empty SQL Query and Data Preview panes.
Select tables in the Data Browser pane to query the database.
Close the data source tab to close the SQL query. In the Connections section, close the database connection by clicking Close Connection.
Note
If multiple connections are open, close the database connection of your choice by selecting the corresponding data source from the Close Connection list.
Connect to SQLite Using JDBC Driver and Command Line
Connect to an SQLite database using the configured JDBC data source, user name
username, and passwordpwd.datasource = "SQLite"; username = "username"; password = "pwd"; conn = database(datasource,username,password);
Close the database connection.
close(conn)