Scenario Anchoring System
RoadRunner Scenario uses an anchoring system in which you can specify the positions of objects as being relative to points called anchors. An anchor is an object in RoadRunner that acts as a reference point for the relative position of other objects in a scenario. Anchors can be any location-based scenario object. For example, an anchor can be:
A point on a road or junction
A point specifying the location of an actor
A path waypoint
RoadRunner contains two types of anchors:
Scenario Anchors — Anchors that are part of the scenario, and enable you to isolate the anchor system for your scenario from the scene. This enables you to create and edit multiple different scenarios with unique anchor configurations on a single scene without overwriting the scene data. Scenario anchors are the default anchor type for new anchors created in scenario editing mode. Scenario anchors are blue.

Scene Anchors — Anchors that are part of the scene, and enable you to create a scene template to maximize compatibility across many different scenarios. Scene anchors are the default anchor type for new anchors created in scene editing mode. To create scene anchors in scenario editing mode, change the default anchor type to scene anchor in the RoadRunner Scenario Application Preferences. Scene anchors are lavender.

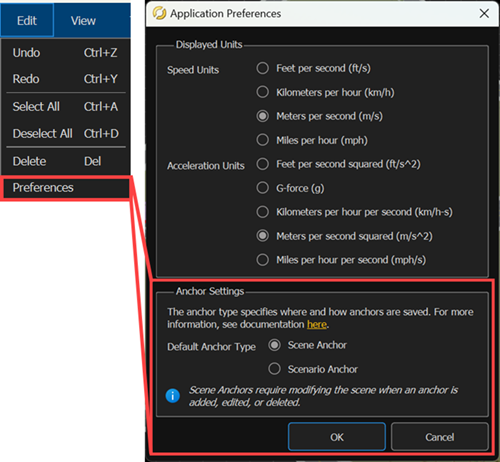
To change the anchor type in the RoadRunner Scenario Application Preferences, select Edit from the RoadRunner Scenario toolbar and select Preferences. Then, in the Application Preferences dialog box, set Default Anchor Type to Scene Anchor or Scenario Anchor. With regard to actors in a scenario, the functionality of scene and scenario anchors is identical.
Note
To change the default anchor type, you must be in scenario editing mode. You cannot create scenario anchors while scene editing mode is active.
Anchored Object Behavior
You can anchor to any location-based scenario object, such as vehicles or path waypoints. When you move an anchor, the objects anchored to it move with it. This feature enables you to move an entire scenario to a new location by dragging a single point. Also, you can relocate anchors and the attached scenarios within the scene and between scenes. For more information on anchor and scenario relocation, see Relocate Scenarios.
Consider a scenario in which four vehicles are either directly or indirectly children of an anchor. The orange arrows in this figure indicate the anchor parentage in the scenario. The scene anchor is in lavender.

If you move the white cement truck backward, the other three vehicles anchored either directly or indirectly to it also move backward. The anchor remains fixed.

If you move the blue pickup truck forward, only the red ambulance moves with it, because the ambulance is the only vehicle that is a child of the pickup truck.
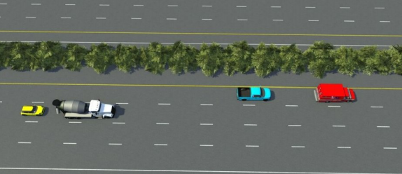
If you move the yellow car, no other vehicles move with it because no other objects have it as an anchor parent. The same case applies for the red ambulance.
If you move the anchor, all four vehicles move with it, enabling you to move the scenario to an entirely new location in a scene.

If you change the shape of a road, the vehicles adapt to the changes while maintaining their relative positioning constraints.

Create and Modify Anchors
In RoadRunner Scenario, the default type of anchor created by placing an actor onto a road, or using the Anchor Tool, is a scenario anchor. Because scenario anchors isolate your scenario to prevent accidental changes to the accompanying scene, they are the preferred anchor type to use when designing scenarios. However, the processes for adding, modifying, and assigning scenario objects to anchors are the same for both scene and scenario anchors.
Anchor an Object to a Road
When you first add a scenario object, such as a vehicle, on or near a road that has an existing anchor, the new object attaches to that anchor. If no anchors exist in the scene or scenario, or if you place an object too far away from any existing anchors, RoadRunner Scenario adds a new anchor in the center of the road and parallel to the object.

By default, each object you add to a scenario has anchoring enabled. To verify this, in the Attributes pane for an actor, under Point Offsets, check that the Enable Anchoring attribute has been selected. This behavior applies to vehicles and other actors, as well as to path waypoints.
If you add additional objects to the same road, these objects also attach to the nearest anchor. If you drag an object to a new road, the parent anchor of the object switches to the anchor of the new road. To prevent an object from changing anchors, in the Attributes pane for that object, select Lock To Anchor.
Manually Add Anchors
RoadRunner automatically creates a new anchor any time you add a vehicle to a
scenario without existing anchors. You can manually add new anchors to a scene by
selecting the Scene Anchor Tool
![]() , or to a scenario by selecting the Anchor
Tool
, or to a scenario by selecting the Anchor
Tool
![]() . Manually adding anchors enables you to add
multiple anchors to a single road, which can be useful on long roads.
. Manually adding anchors enables you to add
multiple anchors to a single road, which can be useful on long roads.
To manually add an anchor to a road, follow these steps:
From the RoadRunner Scenario toolbar, click the Anchor Tool
 .
.Right-click the road to apply the anchor to the center of the road.

You can now attach objects to these anchors as you would any other anchor.
You can add anchors in either scene editing or scenario editing mode. Each anchor you create in scenario editing mode matches the type specified in the Application Preferences, however, in scene editing mode you can create only scene anchors.
Move Objects Relative to Anchor
Each anchoring-enabled object has a Point Offsets section in its Attributes pane that indicates its forward offset and lane offset from the anchor.
If you drag an object along a lane, then, in the Attributes pane, under Forward Offsets, the Offset value of the object from its parent anchor changes. Units are in meters. This table shows sample changes in forward offsets.
| Positive Forward Offset | Negative Forward Offset |
|---|---|
|
|
|


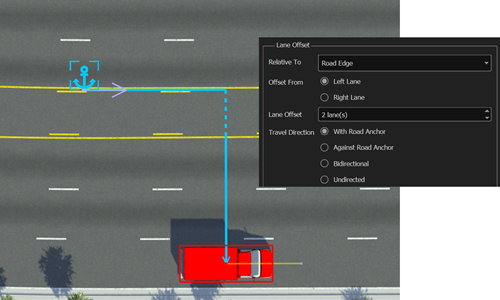
If you drag an object into a different lane, then, in the Attributes pane, under Lane Offset, the offset of the object from the reference lane changes. This table shows the Lane Offset attributes that you can set.
| Attribute | Description |
|---|---|
| Relative To | Specify the location that the anchor is relative to. The only
option available is Road Edge. |
| Offset From | Specify whether to measure the lane offset of the object from the leftmost or rightmost lane in the travel direction of that object by selecting either Left Lane or Right Lane. |
| Lane Offset | Select the number of lanes by which the object is offset from the lane. |
| Travel Direction | Select whether the object is offset with the travel direction of the anchor or against its travel direction. |
| Lateral Offset | Specify how many meters the object is offset from the center of its lane. Lateral Offset is negative to the left and positive to the right for offset from lane center |
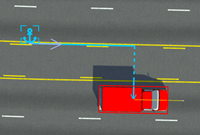
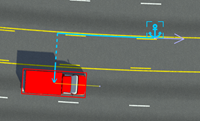
For example, this vehicle is offset two lanes from its left-lane road edge. The vehicle is following the travel direction of the anchor, and no lateral offset has been applied.
When relocating scenarios within a scene, actors maintain their lane-relative positions. For example, suppose a car is in the rightmost lane (zero lanes from the road edge) and a turning lane forms as the road approaches an intersection. If you move the anchor along the road toward the intersection, the car moves into the turning lane to maintain a relative position of zero from the road edge.

To address this, set predefined paths for cars. For an example, see the Design Path Following Scenario example.
Note
To edit an anchor in your scene or scenario, you must select the Scene Anchor Tool or Anchor Tool, respectively.
Modify Anchor Attributes
To modify anchor attributes, select the anchor, or the actor or path waypoint that is an anchor to another object, and make your changes in the Attributes pane. As with scenario anchors, RoadRunner saves the anchor attributes of scenario objects, such as vehicles and path waypoints, to the scenario. When you change these attributes, they affect only the other objects in the scenario. RoadRunner saves the attributes of scene anchors to the scene. If other scenario files reference the scene or scene anchors, then any changes you make to the scene or scene anchors also impact those files.
Tip
When choosing anchor names, choose something easy to remember so that the scenarios are easier to relocate later.
For example, suppose you change the Name
attribute of a scene anchor to ScenarioStart.

For actors within the current scenario that reference this scene anchor, the name of their parent anchor updates automatically to reflect the new name. However, in other scenario files that use this scene, the parent anchor name does not change. Instead, objects previously attached to this anchor become unanchored, and you must then manually place the anchor with the old name back into the scene.
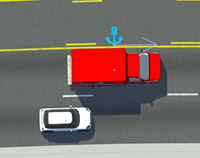
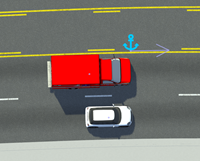
Change Travel Direction of Actors
If you select an anchor, then, in the Attributes pane, you can change its Travel Direction setting to change the travel direction of all parent and child objects either directly or indirectly attached to that anchor. The Forward and Backward travel direction options are based on the direction in which the road was created.
| Travel Direction Set to Forward | Travel Direction Set to Backward |
|---|---|
|
|
|


Align Objects Using Anchors
You can also use anchors as alignment points. For example, suppose you want to align two vehicles by their front bumpers, and they have the same anchor.
Follow these steps:
Select the first vehicle. Then, in the Attributes pane, under Forward Offset, select Manual Reference Line. You can now change how to measure the Offset value from the anchor. By default, RoadRunner Scenario measures Offset from the middle of a vehicle.
Set Reference Line to Front. RoadRunner Scenario now measures the offset of the vehicle from the front of the vehicle.
Set Offset to
0.Repeat the previous steps for the second vehicle. Both vehicles now have their front bumpers aligned with the anchor. If you drag the anchor or adjust its Distance value in the Attributes pane, the front bumpers of the cars remain aligned.
Set Anchors for Path Waypoints
When you specify paths for an actor, the path waypoints anchor to the road by default. Dragging an actor does not change the position of the path waypoint.
Path waypoints have the same Forward Offset and Lane Offset attributes as actors, except for the Manual Reference Line attribute.
Change Anchor Parent
To change the anchor parent of an object, follow these steps:
Click the object, such as a vehicle, to select it.
In the Attributes pane, click the name of the anchor that is defined in the Anchor attribute. RoadRunner Scenario highlights the scenario editing canvas and Logic editor with blue lines to indicate the areas from which you can select a new parent anchor.
In the areas highlighted by the blue lines, select a new parent anchor. If you select an action phase from the Logic editor, then RoadRunner Scenario updates the anchor to the actor that is associated with that action phase.
To find the location of the current parent anchor in the scenario, click the frame
button next to the Anchor attribute value
![]() .
.
Create Templates with Scene Anchors
If you want to build a standardized anchor set to use across all of your scenes and scenarios, instead of creating a unique set of anchors for every scenario, use scene anchors. With scene anchors, you can design scene templates that enable you to maximize scene compatibility with your scenarios. In doing so, you can avoid any unmatched anchors becoming unmapped after relocating your scenario. To learn more about relocating scenarios, see Relocate Scenarios.
Editing scene anchors used by existing scenarios invalidates those scenarios. Ensure you complete all necessary changes to your scene anchors before building your scenario.
To create scene templates for your project, follow these steps:
In scene editing mode, open a scene you want to use as a template. Select File, then Open Scene.
In the RoadRunner toolbar, select the Scene Anchor Tool
 .
. Right-click a road to add a scene anchor. Repeat this step to add more anchors.
Select an anchor and, in the Attributes pane, rename the anchor. Repeat this step for the remaining anchors. Renaming your anchors makes it easier to create matching anchors across multiple scenes. Anchors must have matching names across scenes for a scenario using those anchors to be compatible with multiple scenes.
Save the scene.
Repeat steps 1–5 for each scene for which you want to create a scene anchor template. To ensure compatibility between templates, add the same number of anchors as the first scene, and give the anchors the same names.
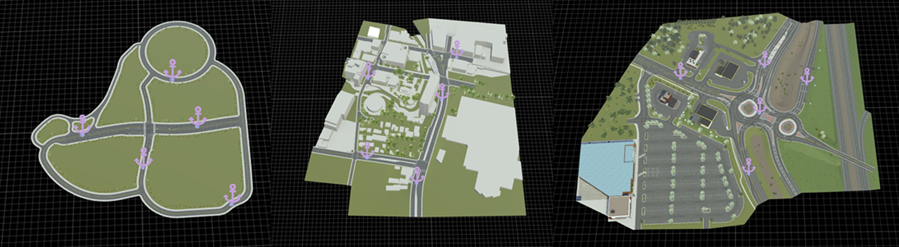
Because each scene has the same number of scene anchors with the same names, scenarios you create on one scene are compatible with the others. This means you can relocate any scenario you create on one scene to any of the other scenes with the same anchor template without needing to remap missing anchors and their scenario objects.