Specify Multiple Scenarios for Model Simulation
R2026bYou can simulate a model in multiple scenarios within a single response optimization problem, using the Response Optimizer app. A simulation scenario configures variables of a model. Each scenario evaluates requirements independently. You can optimize your model variables so that the model meets your requirements across multiple scenarios. You can also combine requirement values across scenarios and then optimize your model variables to meet the new combined requirement.
You can specify multiple scenarios for model simulation in optimization problems that reflect real-world operating conditions. For example, use multiple scenarios to optimize a design that must perform well under multiple environmental conditions.
Specify Simulation Scenarios and Link Requirements
To define multiple scenarios for a model, first specify the design variables and
define the requirements for optimization. Then, on the Response
Optimization tab, click Scenarios. The Simulation
Scenarios dialog box opens with a default simulation scenario to which all of the
requirements are linked. The default scenario configures the model variables to use
their original values. To add a scenario to the table, click  on the top left of the dialog box. To delete a scenario, select it
in the table and click
on the top left of the dialog box. To delete a scenario, select it
in the table and click  . To change the position of a scenario, select it in the table and
click
. To change the position of a scenario, select it in the table and
click  or
or  . To rename a scenario, double-click it in the table.
To edit a scenario, select it in the table and click Edit.
To specify a definition for the scenario, choose one of these options:
Select Type as
Simulink.SimulationInput object. In the Variable menu, select a variable from the MATLAB® workspace that contains aSimulink.SimulationInputobject for the same model for which you are specifying scenarios.Select Type as
Function
                                        handle
. In the Function box, enter a function handle. The function must be in the current working folder, have no inputs, and return one output as aSimulink.SimulationInputobject for the same model for which you are specifying scenarios. To edit the file containing the function, click . If the specified function does not exist,
clicking creates a new function with the specified
function name.
. If the specified function does not exist,
clicking creates a new function with the specified
function name.Select Type as
Default. The default scenario configures the model variables to use their original values.
To temporarily apply the scenario definition to the model, click Apply to model. To verify that the values of the configured variables change as specified in the scenario definition, locate the defined variables in the model and view their values. To restore the model, click OK.
To link requirements to the scenario, select them from the table. You can link a requirement to multiple scenarios.
To apply the edits, click Apply.
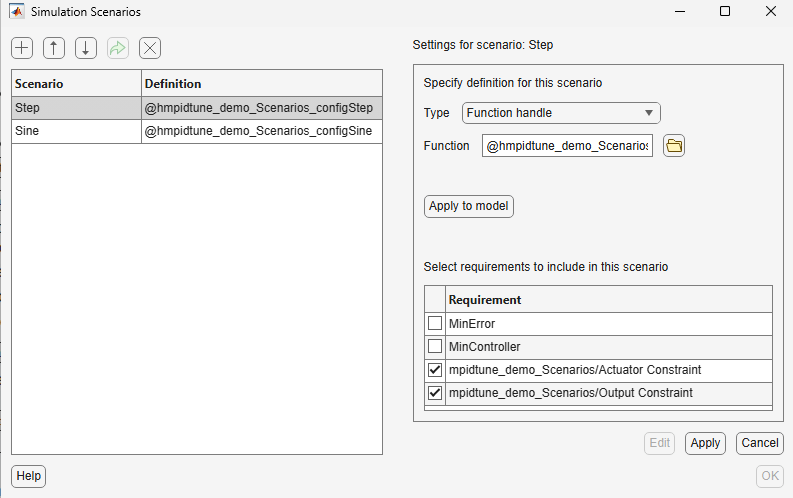
By default, when you add a new scenario after defining the requirements, the app does not link any requirements to the new scenario. However, when you add a new requirement after creating scenarios, the app links the new requirement to all existing scenarios by default.
If you selected Type as Simulink.SimulationInput
object for a scenario, you can export the
Simulink.SimulationInput object by selecting the scenario in the
table and clicking  .
.
To close the Simulation Scenarios dialog box, click OK.
Configure Requirements
To configure the requirements linked to each scenario, on the Response Optimization tab, click Configure. The Configure Requirements dialog box opens.
In the Objectives section, select the design objectives to optimize. Design objectives are the requirements that specify the cost to minimize or maximize.
For each design objective you select, specify a weight value and a scale value, each as a positive scalar. The app gives more importance to the design objectives with more weight. The scale helps normalize requirement values so that no single requirement dominates the objective due to differences in magnitude or units. The default value for all weights and scales is
1.During optimization, the overall metric that the solver optimizes will be:
In the Constraints section, select the design constraints to satisfy. Design constraints are the requirements that specify the constraints or bounds.
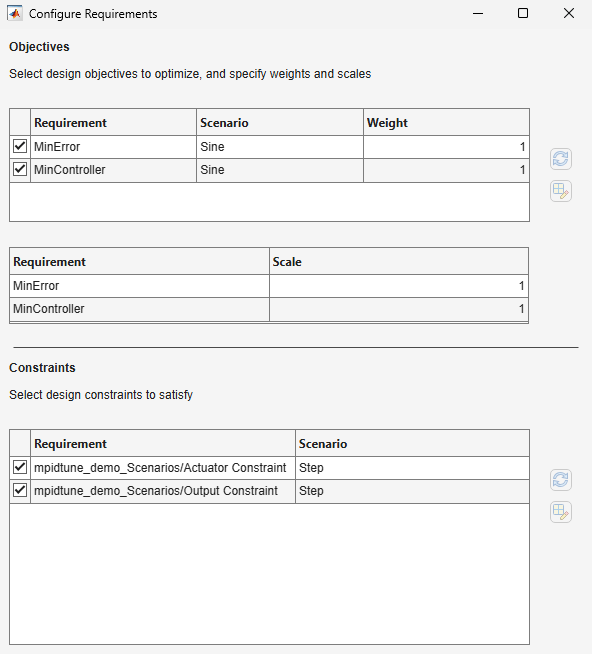
Close the Configure Requirements dialog box.
After you define simulation scenarios and link and configure requirements, you can perform Response Optimizer tasks such as evaluating requirements linked to each scenario, plotting the model responses in the defined scenarios, specifying optimization options, and performing optimization and tradeoff analyses. For more information and examples on response optimization, see Optimize Model Response.
To edit the simulation scenarios programmatically, generate MATLAB code for the multiscenario simulation problem, then modify the generated MATLAB function. For an example that shows how to generate code for optimization problems, see Generate MATLAB Code for Design Optimization Problems (GUI).
For an example on multiscenario simulation, see Optimize Electric Vehicle Thermal Management System Under Multiple Scenarios (GUI).
See Also
Functions
Topics
- Specify Design Variables for Optimization
- Specify Time-Domain Design Requirements in the App
- Specify Frequency-Domain Design Requirements in the App
- Specify Optimization Options
- Interact with Plots
- Optimize Electric Vehicle Thermal Management System Under Multiple Scenarios (GUI)
- Generate MATLAB Code for Design Optimization Problems (GUI)

