Back-to-Back Equivalence Testing
This example shows how to create and run a back-to-back test on a whole model to compare the results of normal mode simulation and software-in-the-loop (SIL) simulation. Back-to-back testing, or equivalence testing, tests whether the generated code produces the same results as the model simulation. This type of testing can also expose coverage gaps and increase confidence that the generated code is working as expected. Implementing and testing functional requirements, validating the code generated from the model, and achieving 100% model and code coverage are key parts of compliance for software and safety standards and certifications, such as ISO 26262 and IEC 61508.
This example shows only model and SIL testing. SIL simulation compiles and runs the generated code on your development computer. Processor-in-the-loop (PIL) simulation cross-compiles source code on your development computer, and then downloads and runs the object code on a target processor or an equivalent instruction set simulator. For full compliance, you need to also do PIL testing. See Configure and Run PIL Simulation (Embedded Coder) and SIL and PIL Limitations (Embedded Coder) for more information.
The test results of normal mode simulation and the generated code might differ due to numerical differences, such as differences in tolerances when comparing floating-point values. Time delays or compiler issues might also cause differences between the code and simulation. Back-to-back test results that do not match can expose one or more existing issues, which you can fix so the model and generated code comply with the applicable industry standards and certifications.
The sf_boilerController model in this example contains a Stateflow chart that models a temperature controller for a boiler. The model is derived from the Model Bang-Bang Temperature Control System (Stateflow) example.
Open the Model and Test Manager
Open the model. Then open the Test Manager and clear the previously loaded test files and results.
Model = "sf_boilerController";
open_system(Model)

sltest.testmanager.view

sltest.testmanager.clear
sltest.testmanager.clearResults
Open the Create Test for Model Component Wizard
In the Test Manager, select New > Test for Model Component to open the Create Test for Model Component wizard.
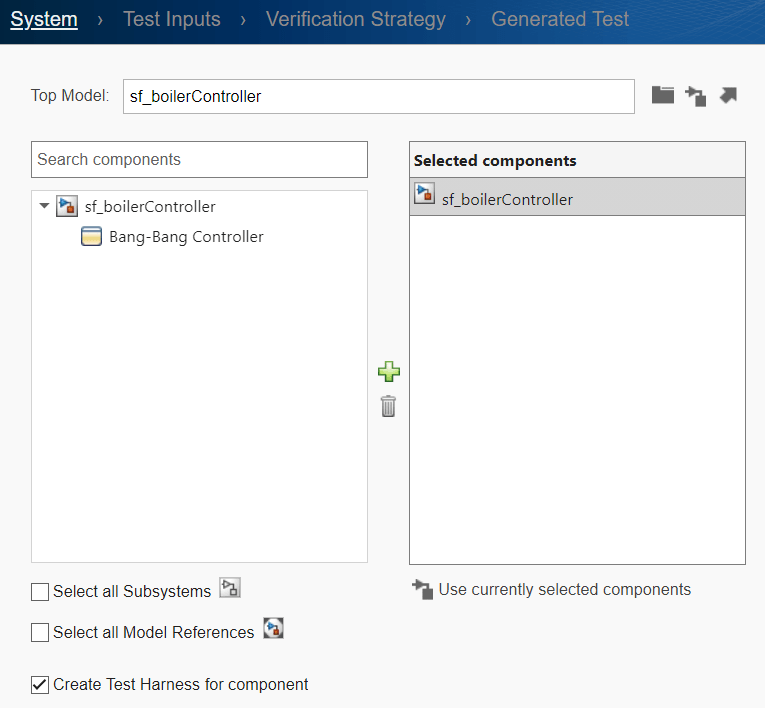
Specify the Model and Components to Test
1. In the System tab, click the Use current model button ![]() to add the model to the Top Model field.
to add the model to the Top Model field.
2. In the left pane, select the top-level model, sf_boilerController to select the whole model.
3. Click the Add button ![]() to add the model to the Selected components pane.
to add the model to the Selected components pane.
4. Click Next.
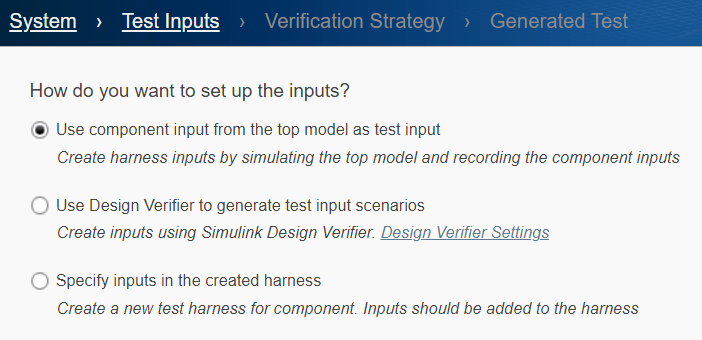
Specify the Test Inputs
In the Test Inputs tab, use the default setting, Use component input from the top model as test input. Then click Next.
Specify How to Test the Component
In the Verification Strategy tab, specify to create a back-to-back test.
1. Select Perform back-to-back testing.
2. Ensure that Simulation1 is set to Normal and Simulation2 is set to Software-in-the-Loop (SIL). Then click Next.

Specify the Input, File Format, and File Locations
In the Generated Test tab, specify the input source, the file format, and where to save the test data and the generated tests.
1. Ensure that Select test harness input source is Inports.
2. Change Specify the file format to Excel. Saving the inputs to Excel lets you view and manually edit the file contents outside of Simulink.
3. Use the default values for the locations to save the test data and the generated tests.
4. Click Done.
The Create Test for Model Component wizard sets up signal logging for the outputs from the chart, simulates the model, captures the signals, and creates a test harness and test case. It also creates the Excel input file, sltest_sf_boilerController.xlsx, and the test file, sltest_sf_boilerController_tests.mldatx.

Check the Simulation Modes
1. In the Test Browser pane of the Test Manager, select the test case the wizard created, sf_boilerController_Harness1. The wizard automatically sets the test case name to the model name_associated test harness name.
2. In the right pane, expand the Simulation 1 section and then expand Simulation Settings and Release Overrides. Check that the Simulation Mode parameter is Normal.

3. Expand the Simulation 2 section and its Simulation Settings and Release Overrides. Check that its Simulation Mode parameter is Software-in-the-Loop (SIL).

Set the Coverage to Collect
1. In the Test Browser pane, select the test file, sltest_sf_boilerController_tests.
2. In the right pane, expand Coverage Settings. You can set up coverage only at the test file level. The coverage settings propagate to the test cases in the file.
3. Select Record coverage for system under test and Record coverage for referenced models to enable coverage collection.
4. Under Coverage Metrics, select Decision, Condition, and MCDC. Most certification standards, including ISO 26262, require these metrics.
Decision coverage analyzes decision points in the model. A decision is a place in the model where one or more input signals decide the output signal of a block. Decision coverage determines whether all decisions are tested.
Condition coverage analyzes blocks that output the logical combination of their inputs and Stateflow transitions. For this example, a test case achieves full coverage when it causes each condition on a Stateflow transition to be true at least once and false at least once during the simulation.
MCDC (Modified Condition/Decision Coverage) extends decision and condition coverage. It analyzes whether each condition within a decision independently affects the decision outcome, and is evaluated to all possible outcomes at least once. For this example, MCDC analyzes the Stateflow transitions.
For more information about coverage and coverage metrics, see Model Coverage (Simulink Coverage) and Types of Model Coverage (Simulink Coverage), respectively.

Run the Test Case and View the Results
1. Select the test case, sf_boilerController_Harness1, and click the Run button in the toolbar. When the test runs, the left pane displays the Results and Artifacts pane.
2. When the test finishes, click the Results in the Results and Artifacts pane to update the right pane.
The Aggregated Coverage Results section shows the code coverage for SIL mode simulation and coverage for functional elements in the model for normal mode simulation. Coverage is less than 100% for both the normal and SIL simulation modes, which indicates that not all of the code and model pathways were exercised during the test. Function coverage metrics do not apply to Normal simulation mode.

Increase the Coverage
You can increase the coverage by using Simulink Design Verifier. After you run a test and collect coverage, Simulink Design Verifier can generate new test cases with different input to test the untested parts of the model.
1. In the Sim Mode column of the Aggregated Coverage Results table, click Normal.
2. Below the table, click Add Tests for Missing Coverage.
3. In the Add Tests for Missing Coverage dialog box, set Test Case to <Create a new test case>.
4. Set Test Type to Equivalence Test.

5. Leave the other fields as their default values. Click OK. Simulink Design Verifier creates a new test suite, test case, and test iterations. The Test Browser shows the new test suite and test case, New Test Case 1.
6. Select New Test Case 1 and expand the Iterations section of New Test Case 1 to see the iterations.
Set the Simulation Modes, Run the New Test Case, and View the Updated Coverage
1. Expand Simulation 1 and Simulation Settings and Release Overrides. Change the Simulation Mode to Normal.
2. Expand Simulation 2 and Simulation Settings and Release Overrides. Change the Simulation Mode to Software-in-the-Loop (SIL).
3. Click the Run button in the toolbar.
4. When the test finishes running, click the latest Results in the Results and Artifacts panel to update the right side pane.
5. View the Aggregated Coverage Results, which are 100% for normal mode, but the Decision metric result for SIL mode is only 94%. The missing Decision coverage for this model is caused by code that evaluates the false condition when values are outside the specified range. The code generator adds integer overflow protection to reduce the long amount of time the test case would need to evaluate all false values.

Justify and Filter the Missing Coverage
You can provide a justification rationale for code lines or model elements that you want to mark as unsatisfied coverage. Reasons for justifying coverage results that might produce less than 100% coverage include code generation optimization, code replacement libraries, error conditions, and defensive code.
1. Click the Create aggregated coverage report arrow in the Report column for the SIL simulation to create a SIL Coverage Summary report.

2. In the SIL Coverage Summary Report for sf_boilerController, go to section 5.1 Decision localDW->temporalCounter_i1 < 31U (line 90). This is one of two lines of code the contributes to the lower Decision coverage result. The specified range has a limited number of integer values so coverage for the true result is 100%, but the false result has an unlimited number of possible values which would require a very long time to test, so the false result cannot be considered to have 100% coverage.
3. Click the Justify or Exclude link or the Add justification rule icon next to the highlighted false result to open the Filter Explorer.

4. In the Filter Rules section of the Filter Explorer, change the Mode for the displayed code line to Justified. Add "Integer overflow protection in generated code can only be exercised by unrealistically long test case" as the Rationale for the justification. For information about coverage filtering, see Coverage Filtering (Simulink Coverage) and Coverage Filter Rules and Files (Simulink Coverage).

5. Click Apply and in the Save Filter File dialog box, enter boilerController_covfilter as the name of the coverage filter (.cvf) file and click Save.
6. In the SIL Coverage Summary Report for sf_boilerController, notice that section 5.1 is now Justified, its Coverage is 100%, and the false line of the table is highlighted in light blue.

7. Go to section 5.2 Decision localDW->temporalCounter_i2 < 63U (line 94). in the report and repeat steps 3 and 4 to justify the missing coverage for that false decision. Use the same rationale that you used for section 5.1.
8. Click Apply to update the boilerController_covfilter.cvf coverage filter file and the SIL Coverage Report. The Summary section of the report shows 100% coverage with the light blue portions of the coverage percent bars indicating justified coverage. In the Test Manager, the Aggregated Coverage Results show the updated coverage and the coverage filter file is listed in the Coverage Filters section.

9. At the bottom of the Coverage Filters pane, click Update Test File to append the coverage filter to the test file.
View the Simulation Output Results for Equivalence
Expand the Results > New Test Case 1 > Iteration1 and select Equivalence Criteria Result. Then, in the Compare tab of the embedded Simulation Data Inspector, select the Outport:1 signal.

The upper plot shows both the normal mode and SIL mode outputs, which overlap. The lower plot shows that the difference between the output signals is zero, so the normal mode and SIL mode simulations match.

Clean up
Use these commands to close the model and close and clear the Test Manager:
close_system(Model,0)
sltest.testmanager.clear
sltest.testmanager.clearResults
sltest.testmanager.close
See Also
sltest.testmanager.TestFile | sltest.testmanager.TestCase | Simulink Test Manager
Topics
- Generate Tests and Test Harnesses for a Model or Components
- Import Test Cases for Equivalence Testing
- Back-to-Back (MIL/SIL) Equivalence Testing an Atomic Subsystem
- Configure and Run SIL Simulation (Embedded Coder)
- SIL/PIL Manager Verification Workflow (Embedded Coder)
- Unit Test Subsystem Code with SIL/PIL Manager (Embedded Coder)