Series-Compensated Transmission System
Description of the Transmission System
The example described in this section illustrates modeling of series compensation and related phenomena such as subsynchronous resonance in a transmission system.
The single-line diagram shown here represents a three-phase, 60 Hz, 735 kV power system transmitting power from a power plant consisting of six 350 MVA generators to an equivalent system through a 600 km transmission line. The transmission line is split into two 300 km lines connected between buses B1, B2, and B3.
Series and Shunt Compensated Transmission System

To increase the transmission capacity, each line is series compensated by capacitors representing 40% of the line reactance. Both lines are also shunt compensated by a 330 Mvar shunt reactance. The shunt and series compensation equipment is located at the B2 substation where a 300 MVA-735/230 kV transformer feeds a 230 kV-250 MW load.
Each series compensation bank is protected by metal-oxide varistors (MOV1 and MOV2). The two circuit breakers of line 1 are shown as CB1 and CB2.
This power system is available in the Three-Phase Series Compensated Network model. Load this model and
save it in your working directory as case1 to allow further
modifications to the original system.
Compare the Simscape™ Electrical™ Specialized Power Systems circuit model (Series-Compensated System (power_3phseriescomp)) with the schematic diagram above (Series and Shunt Compensated Transmission System). The generators are simulated with a Simplified Synchronous Machine block. A Three-Phase Transformer (Two Windings) block and a Three-Phase Transformer (Three Windings) block are used to model the two transformers. Saturation is implemented on the transformer connected at bus B2.
The B1, B2, and B3 blocks are Three-Phase V-I Measurement blocks taken from the Simscape > Electrical > Specialized Power Systems > Measurements library. These blocks are reformatted and given a black background color to give them the appearance of bus bars. They output the three line-to-ground voltages and the three line currents. Open the dialog boxes of B1 and B2. Note how the blocks are programmed to output voltages in pu and currents in pu/100 MVA. Notice also that the voltage and current signals are sent to internal Goto blocks by specifying signal labels. The signals are picked up by the From blocks in the Data Acquisition subsystem.
The fault is applied on line 1, on the line side of the capacitor bank. Open the dialog boxes of the Three-Phase Fault block and of the Three-Phase Breaker blocks CB1 and CB2. See how the initial breaker status and switching times are specified. A line-to-ground fault is applied on phase A at t = 1 cycle. The two circuit breakers that are initially closed are then open at t = 5 cycles, simulating a fault detection and opening time of 4 cycles. The fault is eliminated at t = 6 cycles, one cycle after the line opening.
Series-Compensated System (power_3phseriescomp)

Series Compensation1 Subsystem
Now, open the Series Compensation1 subsystem of the Three-Phase Series Compensated Network model. The three-phase module consists of three identical subsystems, one for each phase. A note indicates how the capacitance value and the MOV protection level are calculated. Open the Series Compensation1/Phase A subsystem. You can see the details of the connections of the series capacitor and the Surge Arrester block (renamed MOV). The transmission line is 40% series compensated by a 62.8 µF capacitor. The capacitor is protected by the MOV block. If you open the dialog box of the MOV block, notice that it consists of 60 columns and that its protection level (specified at a reference current of 500 A/column or 30 kA total) is set at 298.7 kV. This voltage corresponds to 2.5 times the nominal capacitor voltage obtained at a nominal current of 2 kA RMS.
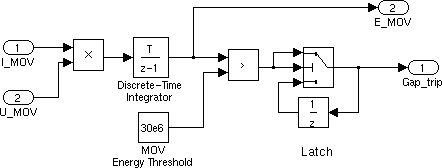
A gap is also connected in parallel with the MOV block. The gap is fired when the energy absorbed by the surge arrester exceeds a critical value of 30 MJ. To limit the rate of rise of capacitor current when the gap is fired, a damping RL circuit is connected in series. Open the Energy & Gap firing subsystem. It shows how you calculate the energy dissipated in the MOV by integrating the power (product of the MOV voltage and current).
When the energy exceeds the 30 MJ threshold, a closing order is sent to the Breaker block simulating the gap.
Series Compensation Module

Series Compensation1/PhaseA Subsystem

Series Compensation1/PhaseA Subsystem/Energy and Gap Firing
Three-Phase Saturable Transformer Model
Open the 300 MVA 735/230 kV Transformer dialog box and notice that the current-flux saturation characteristic is set at
[0 0 ; 0.0012 1.2; 1 1.45] in pu
These data are the current and flux values at points 1, 2, and 3 of the piecewise linear approximation to the flux linkage curve shown here.
Saturable Transformer Model
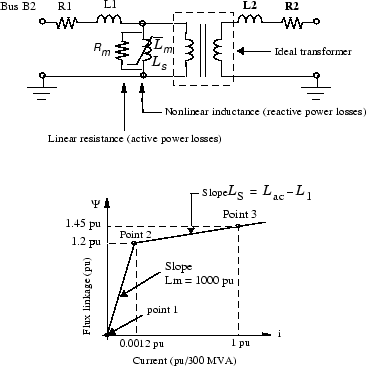
The flux-current characteristic is approximated by the two segments shown in the graph here. The saturation knee point is 1.2 pu. The first segment corresponds to the magnetizing characteristic in the linear region (for fluxes below 1.2 pu). At 1 pu voltage, the inductive magnetizing current is 0.0010/1.0 = 0.001 pu, corresponding to 0.1% reactive power losses.
The iron core losses (active power losses) are specified by the magnetization resistance Rm = 1000 pu, corresponding to 0.1% losses at nominal voltage.
The slope of the saturation characteristic in the saturated region is 0.25 pu. Therefore, taking into account the primary leakage reactance (L1 = 0.15 pu), the air core reactance of the transformer seen from the primary winding is 0.4 pu/300 MVA.
Setting the Initial Load Flow and Obtaining Steady State
Before performing transient tests, you must initialize your model for the desired load flow. Use the load flow utility of the Powergui to obtain an active power flow of 1500 MW out of the machine with a terminal voltage of 1 pu (13.8 kV).
Open the Powergui block and select Machine Initialization. A new window appears. In the
upper right window you have the name of the only machine present in your system. Its
Bus type should be PV
Generator and the desired Terminal
Voltage should already be set to the nominal voltage of
13800 V. In the Active Power
field, enter 1500e6 as the desired output power. Click the
Compute and Apply button. Once the load flow is
solved, the phasors of AB and BC machine voltages as well as currents flowing in
phases A and B are updated in the left window. The required mechanical power to
drive the machine is displayed in watts and in pu, and the required excitation
voltage E is displayed in pu.
Pmec |
|
E/Vf |
|
Notice that Constant blocks containing these two values are already
connected to the Pm and E inputs of the
machine block. If you open the Machine block dialog box, you see that
the machine initial conditions (initial speed deviation dw = 0; internal angle
theta, current magnitudes, and phase angles) are automatically transferred in the
last line.
Once the load flow is performed, you can obtain the corresponding voltage and
current measurements at the different buses. In the Powergui block, select Steady State Voltages and Currents. You can observe, for
example, the phasors for phase A voltages at buses B1,
B2, and B3 and the current entering line 1
at bus B1.
B1/Va |
|
B2/Va |
|
B3/Va |
|
B1/Ia | 1560 A ; 30.50 degrees |
The active power flow for phase A entering line 1 is therefore
corresponding to a total of 464 * 3 = 1392 MW for the three phases.
Transient Performance for a Line Fault
To speed up the simulation, you need to discretize the power system. The sample
time is specified in the Powergui block
as a variable Ts. The sample time Ts=50e-6 has
already been defined in the Model Initialization function in the Callbacks of the
Model Properties. The sample time Ts is also used in the
Discrete Integrator block of the MOV energy calculator
controlling the gap.
Ensure that the simulation parameters are set as follows.
Stop time |
|
Solver options type |
|
Fixed step size |
|
Line-to-Ground Fault Applied on Line 1
Ensure that the fault breaker is programmed for a line-to-ground fault on phase A. Start the simulation and observe the waveforms on the three scopes. These waveforms are shown here.
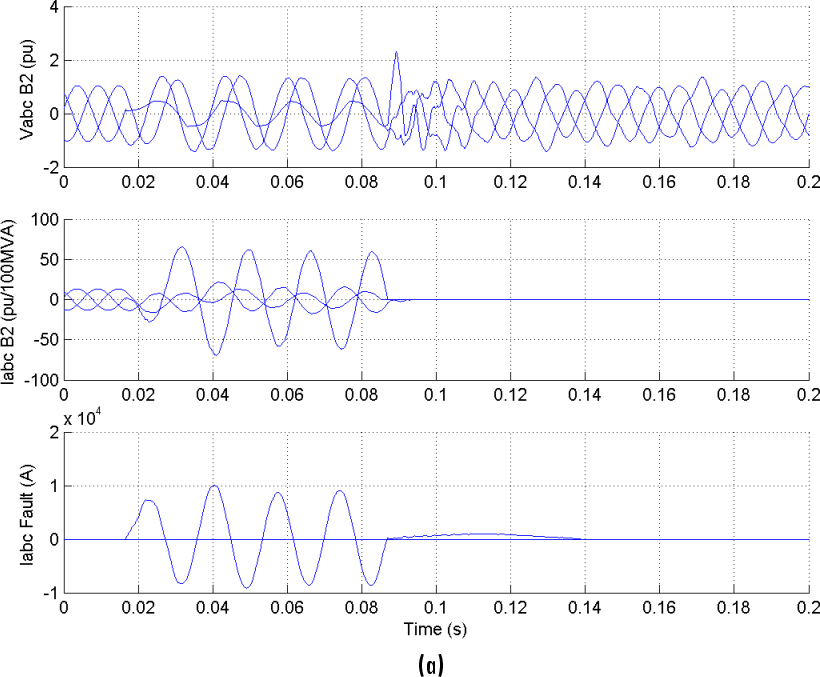
Simulation Results for a Four-Cycle Line-to-Ground Fault at the End of Line 1
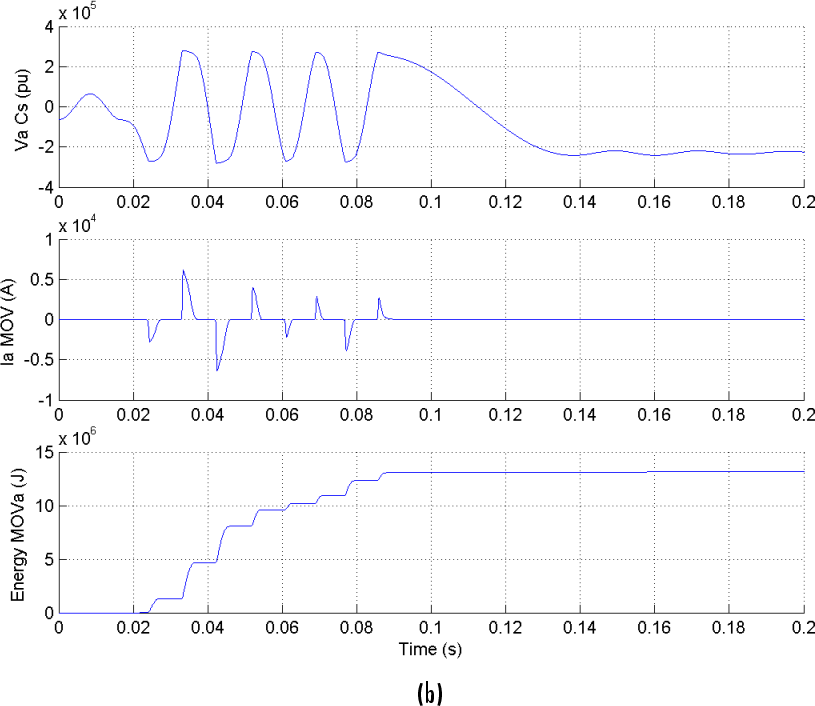
The simulation starts in steady state. At the t = 1 cycle, a line-to-ground fault is applied and the fault current reaches 10 kA (a: trace 3). During the fault, the MOV conducts at every half cycle (b: trace 2) and the energy dissipated in the MOV (b: trace 3) builds up to 13 MJ. At t = 5 cycles the line protection relays open breakers CB1 and CB2 (see the three line currents on trace 2) and the energy stays constant at 13 MJ. As the maximum energy does not exceed the 30 MJ threshold level, the gap is not fired. At the breaker opening, the fault current drops to a small value and the line and series capacitance starts to discharge through the fault and the shunt reactance. The fault current extinguishes at the first zero crossing after the opening order given to the fault breaker (t = 6 cycles). Then the series capacitor stops discharging and its voltage oscillates around 220 kV (b: trace 1).
Three-Phase-to-Ground Fault Applied on Line 1
Double-click the Three-Phase Fault block to open the Block Parameters dialog box. Select the Phase B Fault and Phase C Fault check boxes, so that you now have a three-phase-to-ground fault.
Restart the simulation. The resulting waveforms are shown.
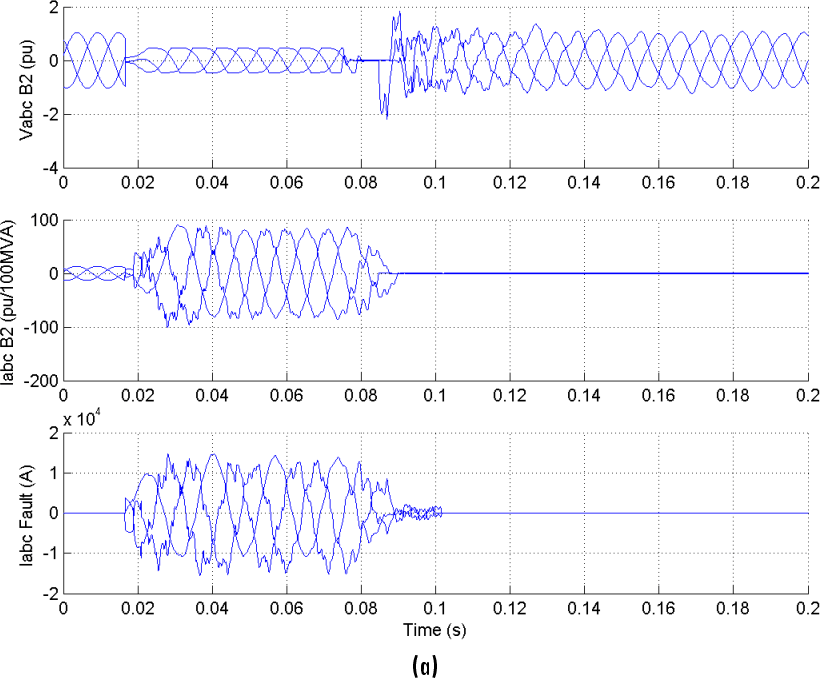
Simulation Results for a Four-Cycle Three-Phase-to-Ground Fault at the End of Line 1
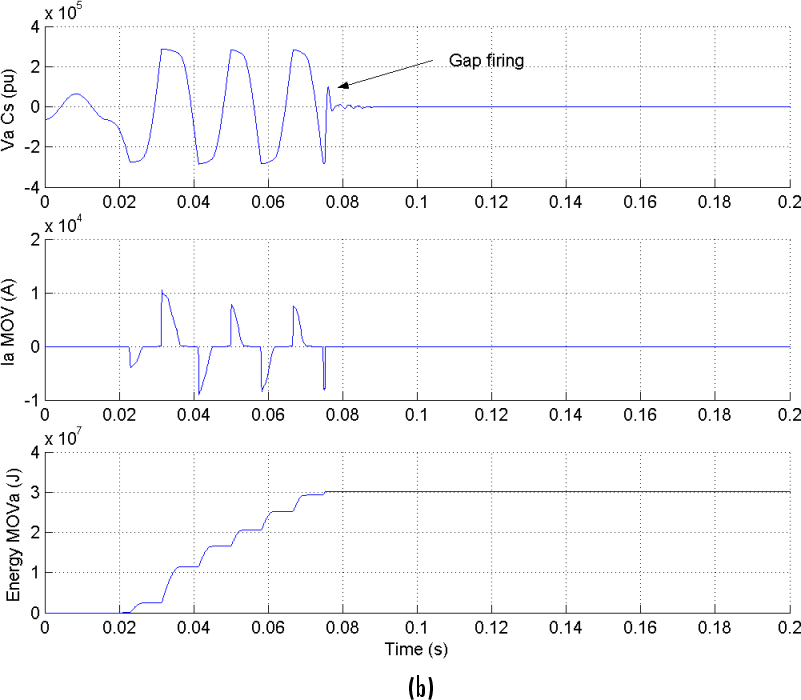
Note that during the fault the energy dissipated in the MOV (b: trace 3) builds up faster than in the case of a line-to-ground fault. The energy reaches the 30 MJ threshold level after three cycles, one cycle before the opening of the line breakers. As a result, the gap is fired and the capacitor voltage (b: trace 1) quickly discharges to zero through the damping circuit.
Frequency Analysis
One particular characteristic of series-compensated systems is the existence of subsynchronous modes (poles and zeros of the system impedance below the fundamental frequency). Dangerous resonances can occur if the mechanical torsion modes of turbine/generator shafts are in the vicinity of the zeros of the system impedance. Also, high subsynchronous voltages due to impedance poles at subsynchronous frequencies drive transformers into saturation. The transformer saturation due to subsynchronous voltages is illustrated at the end of this case study. The torque amplification on a thermal machine is illustrated in another example (see the Subsyncronous Resonance in Steam Turbine and Governor System model).
Now measure the positive-sequence impedance versus frequency seen from bus B2.
The section Analyze a Simple Circuit explains how the Impedance Measurement block allows
you to compute the impedance of a linear system from its state-space model. However,
your case1 model contains several nonlinear blocks (machine and
saturation of transformers). If you connect the Impedance Measurement block to your
system, all nonlinear blocks are ignored. This is correct for the transformer, but
you get the impedance of the system with the machine disconnected. Before measuring
the impedance, you must therefore replace the machine block with an equivalent
linear block having the same impedance.
Delete the Simplified Synchronous Machine
block from your case1 model and replace it with the Three-Phase Source block from the Simscape > Electrical > Specialized Power Systems > Sources library. Open the block dialog box and set the parameters as follows
to get the same impedance value (L = 0.22 pu/ (6 * 350 MVA) Quality factor = 15).
Phase-to-phase rms voltage |
|
Phase angle of phase A |
|
Frequency (Hz) |
|
Internal connection Yg | Specify impedance using short-circuit level |
3-phase short-circuit level |
|
Base voltage |
|
X/R ratio |
|
Save your modified model as case1Zf.
Add the Impedance Measurement block from the Simscape > Electrical > Specialized Power Systems > Sensors and Measurements library into your model. This block is used to perform the impedance measurement. Connect the two inputs of this block between phase A and phase B of the B2 bus. Measuring the impedance between two phases gives two times the positive-sequence impedance. Therefore you must apply a factor of 1/2 to the impedance to obtain the correct impedance value. Open the dialog box and set the multiplication factor to 0.5.
In the Powergui block, select Impedance Measurement. A new window opens, showing your
Impedance Measurement block name.
Fill in the frequency range by entering 0:500. Select the linear
scales to display Z magnitude vs. frequency plot. Click the Save data to workspace button and enter Zcase1 as
the variable name to contain the impedance vs. frequency. Click the Display button.
When the calculation is finished, the magnitude and phase as a function of
frequency are displayed in the two graphs on the window. If you look in your
workspace, you should have a variable named Zcase1. It is a
two-column matrix containing frequency in column 1 and complex impedance in column
2.
The impedance as a function of frequency (magnitude and phase) is shown here.
Impedance vs. Frequency Seen from Bus B2
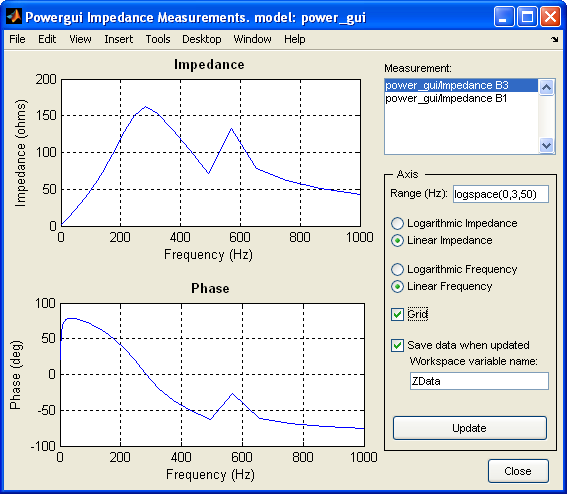
You can observe three main modes: 9 Hz, 175 Hz, and 370 Hz. The 9 Hz mode is mainly due to a parallel resonance of the series capacitor with the shunt inductors. The 175 Hz and 370 Hz modes are due to the 600 km distributed parameter line. These three modes are likely to be excited at fault clearing.
If you zoom in on the impedance in the 60 Hz region, you can find the system's short-circuit level at bus B2. You should find a value of 58 Ω at 60 Hz, corresponding to a three-phase short-circuit power of (735 kV)2 / 58 = 9314 MVA.
Transient Performance for a Fault at Bus B2
The configuration of the substation circuit breakers normally allows clearing a
fault at the bus without losing the lines or the transformers. You now modify your
case1 model to perform a three-cycle, three-phase-to-ground
fault at bus B2:
Disconnect the Three-Phase Fault block and reconnect it so that the fault is now applied on bus B2.
Open the Three-Phase Fault block and make the following modifications in its dialog box:
Phase A, Phase B, Phase C, Ground Faults
All selected
Transition times
[2/60 5/60]
Transition status [1, 0, 1...]
(0/1)
You have now programmed a three-phase-to-ground fault applied at the t = 2 cycles.
Open the dialog boxes of circuit breakers CB1 and CB2 and make the following modifications:
Switching of Phase A
Not selected
Switching of Phase B
Not selected
Switching of Phase C
Not selected
The circuit breakers are not switched anymore. They stay at their initial state (closed).
In the Data Acquisition subsystem, insert a Selector block in the Vabc_B2 output of bus B2 connected to the scope. Set the Elements parameter to
1. This allows you to see the phase A voltage clearly on the scope.You now add blocks to read the flux and the magnetization current of the saturable transformer connected at bus B2.
Add a Multimeter block from the Simscape > Electrical > Specialized Power Systems > Sensors and Measurements library into your
case1model. Open the Transformer dialog box. In the Measurements list, selectFlux and magnetization current. Open the Multimeter block. Verify that you have six signals available. Select flux and magnetization current on phase A, and click OK.You now have two signals available at the output of the Multimeter block. Use a Demux block to send these two signals on a two-trace scope.
In the Simulation tab, click Model Settings. Select Solver and then change Stop time to
0.5. This longer simulation time allows you to observe the expected low-frequency modes (9 Hz). Start the simulation.
The 9 Hz subsynchronous mode excited at fault clearing is clearly seen on the phase A voltage at bus B2 (trace 1) and capacitor voltage (trace 3). The 9 Hz voltage component appearing at bus B2 drives the transformer into saturation, as shown on the transformer magnetizing current (trace 5). The flux in phase A of the transformer is plotted on trace 4. At fault application the voltage at transformer terminals drops to zero and the flux stays constant during the fault.
At fault clearing, when the voltage recovers, the transformer is driven into saturation as a result of the flux offset created by the 60 Hz and 9 Hz voltage components. The pulses of the transformer magnetizing current appear when the flux exceeds its saturation level. This current contains a 60 Hz reactive component modulated at 9 Hz.
