Install Support Package for Customizing Scenes
To customize scenes in the Unreal® Editor and use them in Simulink®, you must install the UAV Toolbox Interface for Unreal Engine® Projects.
Note
These installation instructions apply to R2026a. If you are using a previous release, see the documentation for Other Releases.
Install Unreal Engine and Verify Software and Hardware Requirements
Before installing the UAV Toolbox Interface for Unreal Engine Projects, you must install the Unreal Engine with version that is compatible with your MATLAB release, and verify that your environment meets the minimum software and hardware requirements.
For more information on the compatible version of Unreal Engine, and hardware and software requirements, see Unreal Engine Simulation Environment Requirements and Limitations.
Limitations
Simulink Online™ does not support UAV Toolbox Interface for Unreal Engine Projects.
Install UAV Toolbox Interface for Unreal Engine Projects
After you have installed the Unreal Engine, install the UAV Toolbox Interface for Unreal Engine Projects by following these steps:
On the MATLAB® Home tab, in the Environment section, select Add-Ons > Explore Add-Ons.
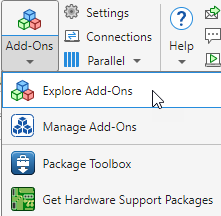
In the Add-On Explorer window, search for the UAV Toolbox Interface for Unreal Engine Projects, then click Install.
Note
You must have write permission for the installation folder.
Configure Environment on Windows Platforms
The UAV Toolbox Interface for Unreal Engine Projects contains these files:
An Unreal Engine project file (
AutoVrtlEnv.uproject) and its associated files. This project file includes editable versions of the prebuilt 3D scenes that you can select from the Scene source parameter of the Simulation 3D Scene Configuration block.Three Unreal Engine plugins (
MathWorkSimulation,MathworksUAVContent, andRoadRunnerMaterials). These plugins establish the connection between Simulink and the Unreal Editor and is required for co-simulation.
After you have installed the UAV Toolbox Interface for Unreal Engine Projects from the Add-On Explorer window, you must copy the files to the correct
locations by using the copyExampleSim3dProject function in the MATLAB Command Window.
For example, this command copies the AutoVrtlEnv project files to
C:\project, and copies the Unreal Engine plugin files to the default location of c:\Program Files\Epic
Games\UE_5.4\Engine\Plugins\Marketplace\Mathworks.
sim3d.utils.copyExampleSim3dProject("C:\project");If you do not install Unreal Engine to the default location, specify the PluginDestination argument. For example, this command copies the
AutoVrtlEnv project files to C:\project, and
copies the Unreal Engine plugin files to <Your custom UE_5.4 install
location>\Engine\Plugins\Marketplace\Mathworks.
sim3d.utils.copyExampleSim3dProject("C:\project", ...
PluginDestination=<Your custom UE_5.4 install location>\Engine\Plugins\Marketplace\Mathworks\Engine\Plugins\Marketplace\MathWorks);
Configure Environment on Linux Platforms
To configure your environment so that you can customize scenes on Linux® platforms:
Install the Unreal Editor in the root directory with this folder structure:
/UnrealEngine/UnrealEngine-5.4/UnrealEngine/Engine/...Use
copyExampleSim3dProjectto copy the support package components and specify thePluginDestinationas/UnrealEngine/UnrealEngine-5.4/UnrealEngine/Engine/Plugins/Marketplace/Mathworks.Set the Unreal Editor as the default application for
.uprojectfile.For example, navigate to
AutoVrtlEnv.uproject.Right-click the
AutoVrtlEnv.uprojectfile, select Open With, and then select Open With Other Application.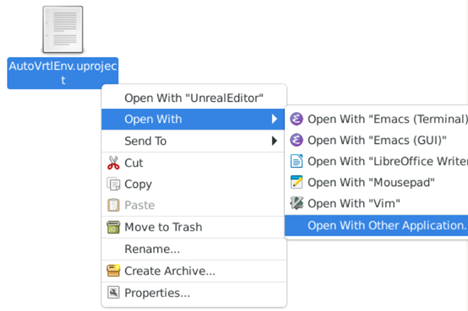
Click Browse and select the Unreal Editor application in
/UnrealEngine/UnrealEngine-5.4/UnrealEngine/Engine/Binaries/Linux/UnrealEditor. In the Open With dialog box, selectUse as default for this kind of file.
Install Cesium for Unreal Plugin
Install
the Cesium® for Unreal Plugin and enable the MathWorks Geospatial plugin.
Note
The UAV Toolbox Interface for Unreal Engine Projects supports the Cesium plugin version 2.16.0.
To download this version of the plugin, see https://github.com/CesiumGS/cesium-unreal.
Install the Cesium for Unreal plugin from
https://github.com/CesiumGS/cesium-unreal. Follow the directions to download the plugin.Enable the
MathWorks Geospatialplugin in the Unreal Editor. In the Unreal Editor toolbar, select Settings > Plugins.In the Plugins window, verify that the MathWorks Geospatial plugin is listed in the installed window. If the plugin is not already enabled, select the Enabled check box.
Close the editor.
Next Steps
After you have installed and configured the UAV Toolbox Interface for Unreal Engine Projects, you can now start to customize Unreal Engine scenes that are contained in the
AutoVrtlEnvproject and run simulations. For more details, see Customize Unreal Engine Scenes Using Simulink and Unreal Editor.Alternatively, if you want to use a Unreal project that you have developed using the previous version of UAV Toolbox Interface for Unreal Engine Projects, you must first migrate the Unreal project before you can start to customize the scenes and run simulations. For more details, see Migrate Projects Developed Using Prior Support Packages.